HyundaiBook.ru
Repair Chevrolet Repair Honda Repair Toyota Repair Land Rover Repair VAZ Repair Renault Repair Nissan
English Русский
Български
Беларускі
Український
Српски
Hrvatski
Română
Polski
Slovenský
Magyar
ArticlesSitemapContacts  


  Accent   Elantra   Getz   Grandeur   Sonata   Santa Fe   Tucson   Others
Sonata 3 (1993-1998) Sonata 4 (2001-2012, petrol)
  • Main
  • Sonata
  • Y3 (1993-1998)
  • Chassis
  • Steering
  • Power Steering Oil Pump — Removal, Disassembly, Check, Assembly and Installation

Power Steering Oil Pump — Removal, Disassembly, Check, Assembly and Installation (Hyundai Sonata Y3)

0
Contents: Removal ⇓ Disassembly ⇓ Examination ⇓ Assembly ⇓ Installation ⇓
Power Steering Oil Pump — Removal,…


Removal


1. Remove the delivery hose from the oil pump.

2. Disconnect the suction hose and drain the working fluid into a container.

3. Loosen the tensioner mounting nut and adjusting bolt, and then remove the rubber V-belt (for V6 Engine).

4. Loosen the oil pump mounting bolts to remove the V-belt (for DOHC engines).

5. Loosen the oil pump bracket mounting bolt and disconnect the pressure sensor connecting element.
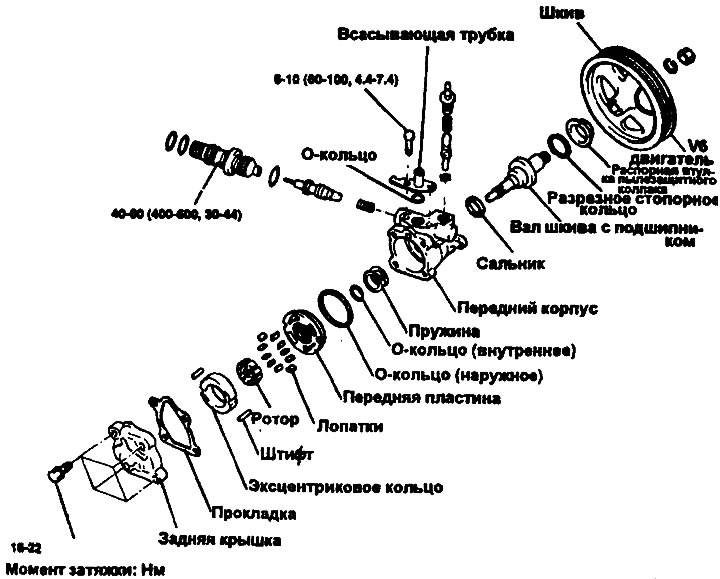
Disassembly


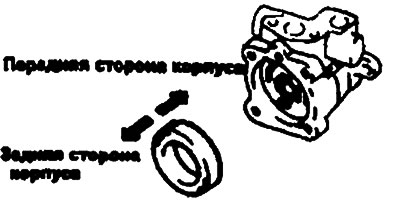
1. Remove the suction pipe connector and ring from the oil pump.

2. Remove the back cover with gasket and pins.

3. Remove the eccentric ring.

4. Remove the rotor and blades.

5. Remove the front plate.

6. Remove the inner and outer O-rings.

7. Remove the spring.

Note: A new gasket and O-ring must be installed during assembly.


8. Remove the pulley nut and spring washer.

9. Knock out the pulley and woodruff key.

10. Remove the split retaining ring using special pliers.

11. Remove the pulley shaft and bearing. If necessary, you can use a plastic hammer for this chain.

12. Remove the oil seal from the oil pump housing.


Note: A new oil seal must be installed during assembly.


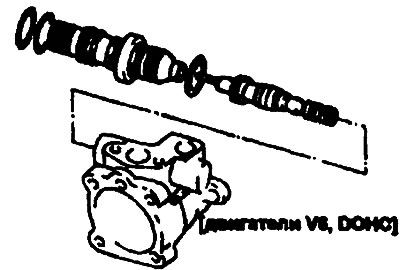
13. Remove the connecting element from the oil pump body and then remove the valve and spring.

14. Remove the O-ring from the connector.

14. Remove the O-ring from the…

Warning: Do not disassemble the valve.


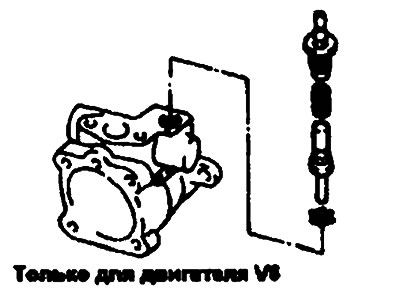
15. Remove the oil pump pressure sensor.

16. Remove the spring and valve core.

17. Remove the O-ring from the pressure sensor.

Examination


1. Clean all disassembled parts with an appropriate solvent.

2. If any part of the oil pump is found to be damaged, the entire pump must be replaced.

3. If the pulley is found to be defective, replace it.

4. If oil leaks are detected through the pulley shaft seal, replace the seal.

5. If the teeth on the pulley or pulley shaft are deformed or worn, these parts should be replaced.


Assembly


1. Install the oil pump switch.

2. Install the flow control valve spring, valve itself and coupling device into the pump body.

Note: Apply a thin coat of ATP DEXRON II type compound to all parts including the seal and O-ring.


3. Using a special tool (09222-32100) install the seal into the pump body.

4. Carefully insert the shaft into the assembly and install the snap ring.

5. Install the pump drive pulley together with the woodruff key into place.

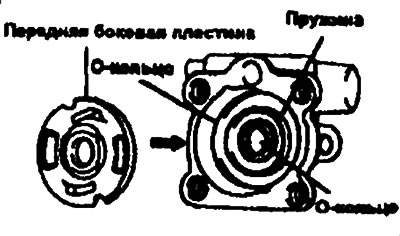
6. Install the spring, inner and outer O-rings.

7. Install the front side plate.

7. Install the front side plate.

8. Insert your fingers into the recess of the front housing, then install the eccentric ring, paying attention to the direction of these elements.

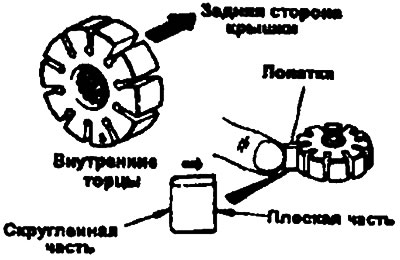
9. Install the rotor so that the mark faces the front of the side plate.


10. Position the blades so that their rounded ends face outward.

11. Install the gasket and back cover.

12. Secure the suction connector.

Installation


1. Place the oil pump on the bracket.

2. Install the suction hose.

3. Install the toothed V-belt and adjust its tension.

3. Install the toothed V-belt and…


4. Connect the discharge hose to the oil pump and the suction hose to the oil tank.

Note: Install the hoses so that they are not twisted or in contact with any other part of the vehicle.


5. Add oil to the tank to the required level.
  • Recommended oil: ATF DEXRON II type

6. Bleed the system to remove air from it.

7. Check the pressure developed by the oil pump.

8. Tighten all parts to the required torque.
This article is available at russian, bulgarian, belarusian, ukrainian, serbian, croatian, romanian, polish, slovak, hungarian
This article has been reviewed by: Konstantin Smirnov
Add to social network:

Previous
Sonata 3: Steering
Next

Power steering housing
Steering column and shaft — removal, inspection and installation
Pumping the system
Checking the oil pump pressure
Checking the power steering belt tension
Power steering hoses
We recommend other articles on the topic of Hyundai manuals:

Power Steering Pump Belt Hyundai Accent 1 (1994-1999)
Power Steering Pump — Removal and Installation Hyundai Elantra 1 (1990-1995, petrol)
Checking the tension of the power steering pump drive belt Hyundai Getz (2002-2011)
Adjusting the power steering and air conditioning pump drive belt Hyundai Santa Fe 2 (2007-2012, petrol)
Power steering gear — technical condition check Hyundai Tucson 1 (2005-2010)
Checking the tension of the power steering pump drive belt Hyundai Matrix (2001-2010, petrol)

Link in different formats to this article

Visitor comments
No comments yet


How much will 34 + 20 ?


Sonata 4 (2001-2012, petrol) 
  • General information
  • User manual
  • Maintenance
  • Power unit
  • 2.0 and 2.4 liter engines
  • 2.7 liter engines
  • Engine overhaul
  • Cooling system
  • Intake and exhaust systems
  • Lubrication system
  • MFI fuel injection system
  • Engine electrical equipment
  • Transmission
  • Clutch
  • Mechanical gearbox
  • Automatic gearbox
  • Drive shafts
  • Chassis
  • Front suspension
  • Rear suspension
  • Steering
  • Brake system
  • Body
  • Exterior
  • Interior
  • Heater and air conditioner
  • Security systems
  • Electrical equipment
  • Troubleshooting
  • Electrical circuits
Sonata 3 (1993-1998) 
  • General information
  • Maintenance
  • Power unit
  • Engine repair I4 DOHC
  • Engine repair I4 SOHC
  • Engine repair V6 SOHC
  • Cooling system
  • Intake and exhaust system
  • Exhaust gas treatment
  • Fuel system
  • Transmission
  • Clutch
  • Mechanical gearbox
  • Automatic transmission KM-175
  • Automatic transmission F4A33
  • Chassis
  • Front suspension
  • Rear suspension
  • Steering
  • Brake system
  • Body
  • Body elements
  • Electrical equipment
  • Equipment and devices
HyundaiBook.ru © 2018-2026 · Mobile version · Sitemap: EN BG BY UA RS HR RO PL SK HU · Administration · Site search · Hyundai owners Accent 1 · Accent 2 · Accent 3 · Elantra 1 · Elantra 2 · Elantra 3 · Getz · Sonata 3 · Sonata 4 · Santa Fe 2 · Tucson 1 · Tucson 2 · Matrix ·
This site uses cookies to optimize its functionality. By continuing, you agree to our terms.