
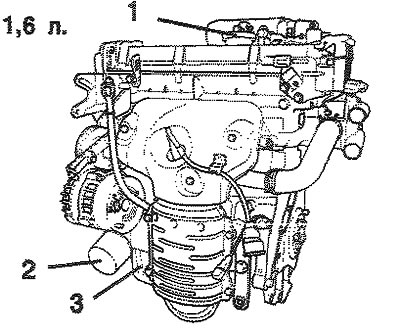
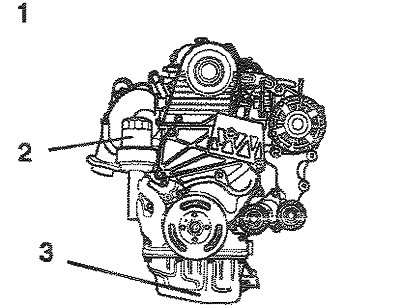
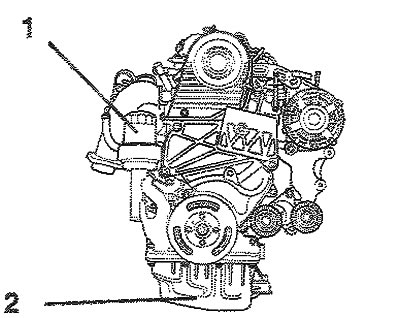
Petrol engine / diesel engine: right hand drive models
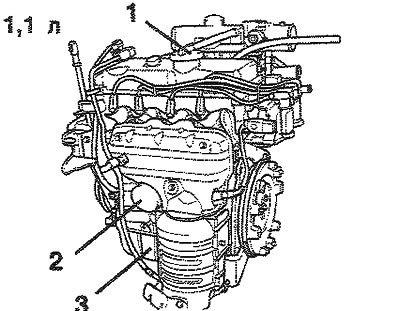
1 - Engine oil filler cap 2 - Oil filter 3 - Drain plug |

1 - Engine oil filler cap 2 - Oil filter 3 - Drain plug |
1 - Engine oil filler cap 2 - Oil filter 3 - Drain plug |
1 - Diesel engine (right hand drive models) 2 - Oil filter 3 - Drain plug |
The engine oil and oil filter must be replaced at the intervals specified in the periodic maintenance chart in the Service Book.
When operating the vehicle under severe operating conditions, the engine oil and oil filter must be replaced more frequently. The engine oil and oil filter must be replaced in the following order:
1. Park the vehicle on a level surface and apply the parking brake. Start the engine and let it run until the coolant temperature gauge needle rises above the minimum mark on the scale. Turn off the engine and move the selector lever to the "P" ("Park") position (automatic transmission) or the gearshift lever to the reverse position (manual transmission).
2. Open the hood and remove the engine oil filler cap.
3. From underneath the vehicle, loosen the drain plug by turning it counterclockwise using the appropriate wrench. Before completely unscrewing the drain plug, make sure that the draining oil will fall into a specially prepared container.
Warning: Be very careful when draining engine oil as it may be hot and could burn you!
4. After a little has drained, install the drain plug with a new sealing washer and tighten it by turning it clockwise. Tightening torque of the drain plug: 35-45 N·m.
5. Remove the oil filter. The filter must be unscrewed by hand. (If your hands are oily, try wrapping the filter in a cloth). Place a specially prepared container for draining the oil under the oil filter, since after unscrewing it, a small amount of oil will flow out.
6. Install the new oil filter following the instructions on the package or on the filter itself. Do not overtighten it. Tightening torque:
- Petrol engine - 12-16 Nm
- Diesel engine (right-hand drive models) - 23-25 Nm
Make sure the engine housing mounting surface is clean and free of old gasket residue. Lubricate the new filter gasket with a small amount of clean engine oil.
7. Fill the engine crankcase with the recommended amount of engine oil. The engine oil capacity is indicated in Section 7.
8. Start the engine and check for oil leaks from the oil filter and drain plug.
9. Stop the engine and check the oil level again.
Note: Always dispose of used motor oil properly. It is recommended to place the oil in a sealed container and take it to a service station for disposal. Do not pour used motor oil on the ground or dispose of it with household garbage.
Warning: Prolonged and repeated skin contact with used motor oil will cause dryness, irritation and dermatitis. After contact with used motor oil, wash your hands immediately with soap and water.
Diesel engine: left-hand drive
1 - Oil filter
2 - Drain plug
The engine oil and oil filter must be replaced at the intervals specified in the periodic maintenance chart in the Service Book.
When operating the vehicle under severe operating conditions, the engine oil and oil filter must be replaced more frequently. The engine oil and oil filter must be replaced in the following order:
1. Park the vehicle on a level surface and apply the parking brake. Start the engine and let it run until the coolant temperature gauge needle rises above the minimum mark on the scale. Turn off the engine and move the selector lever to the "P" ("Park") position (automatic transmission) or the gearshift lever to the reverse position (manual transmission).
2. Open the hood and remove the oil filter cover.
3. From underneath the vehicle, loosen the drain plug by turning it counterclockwise using the appropriate wrench. Before completely unscrewing the drain plug, make sure that the draining oil will fall into a specially prepared container.
Warning: Be very careful when draining engine oil as it may be hot and could burn you!
4. After a little has drained, install the drain plug with a new sealing washer and tighten it by turning it clockwise. Tightening torque of the oil pan drain plug: 35-45 N·m.

1 - Top cover
2 - O-ring gasket
3 - Washer
4 - Filter element
5 - Oil filter drain plug
6 - Oil filter housing
5. Loosen the oil filter drain plug by turning it counterclockwise with a suitable wrench and drain some of the oil from the oil filter. Make sure that the drained oil will fall into a specially prepared container.
6. Pull out the top cover of the oil filter with a special tool until the O-ring appears. Then drain the oil completely.
7. Remove the top oil filter cover with the filter element from the oil filter housing. Use a clean cloth to remove dirt and oil from the oil filter housing.
8. Install a new copper washer on the oil filter drain plug and tighten the plug by turning it clockwise. Tightening torque: 8-10 N·m.
9. Install a new filter element and O-ring into the oil filter upper cover, then install the oil filter upper cover onto the oil filter housing and tighten it by turning it clockwise. Do not overtighten it. Tightening torque: 23-25 N·m.
10. Fill the engine crankcase with the recommended amount of engine oil. The engine oil capacity is indicated in Section 8.
11. Start the engine and check for oil leaks from the oil filter and drain plug.
12. Turn off the engine and recheck the oil level.
(The original can be found on the resource www.HyundaiBook.ru)
Note: It is recommended to change the engine oil and filter at an authorized Hyundai dealer.
Note: Always dispose of used motor oil properly. It is recommended to place the oil in a sealed container and take it to a service station for disposal. Do not pour used motor oil on the ground or dispose of it with household garbage.
Warning: Prolonged or repeated skin contact with used motor oil will cause dryness, irritation and dermatitis. After contact with used motor oil, wash your hands immediately with soap and water.