


Removal the hub
Remove the front wheel.
Knock out the cotter pin and unscrew the front wheel hub mounting nut.
Remove the caliper assembly with the pad guide and brake pads from the steering knuckle and hang it on a technical hook or wire to the car body.
Remove the wheel speed sensor from the steering knuckle.
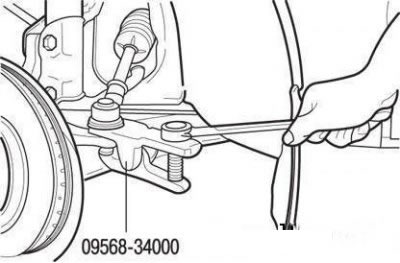
Pressing out the ball joint pin of the steering tie rod end from the steering knuckle using the puller 09568-34000
Using puller 09568-34000, press out the ball joint pin of the steering tie rod end from the steering knuckle.
Note: To prevent the 09568-34000 puller from falling, tie it to a nearby component.
Replacing the front suspension hub bearing
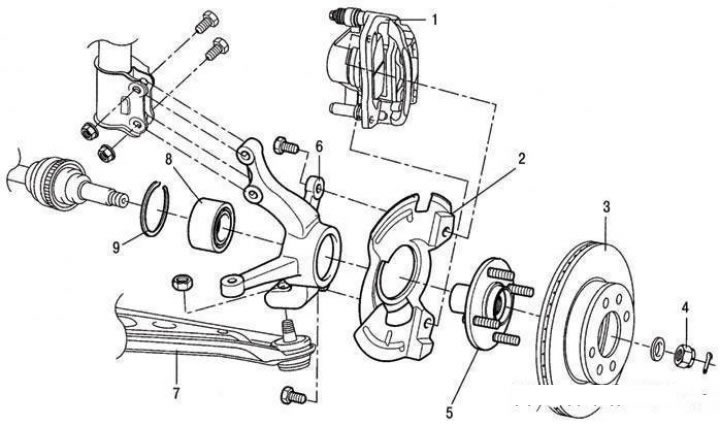
Front suspension strut steering knuckle: 1 – brake caliper assembly with pads; 2 – protective cover; 3 – brake disc; 4 – hub mounting nut; 5 – hub; 6 – steering knuckle; 7 – suspension arm; 8 – hub bearing; 9 – retaining ring
Using puller 09568-34000, press out the ball joint pin of the suspension arm from the steering arm.
Place the washer under the hub nut with the concave side facing inward.
Steering knuckle
Disconnect the wheel drive shaft from the hub.
Disconnect the suspension strut from the steering knuckle.
Remove the steering knuckle assembly with the hub.
Installation
Installation is carried out in the reverse order of removal.
Tighten the threaded connections to the torques specified below, N·m:
- Hub mounting nut - 200-260
- Nut for fastening the ball joint pin of the control arm to the steering knuckle — 60–72
- Nuts for mounting bolts of suspension strut to steering knuckle — 110–130
Disassembly
Remove the brake disc from the hub by unscrewing the two mounting screws.
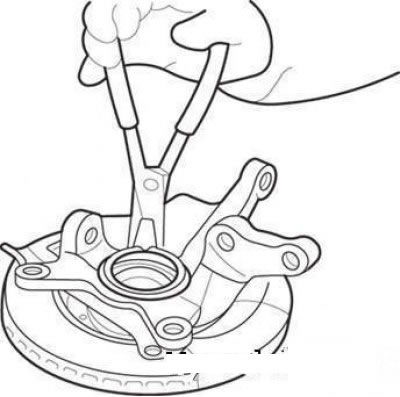
Removing the retaining ring
Remove the retaining ring.
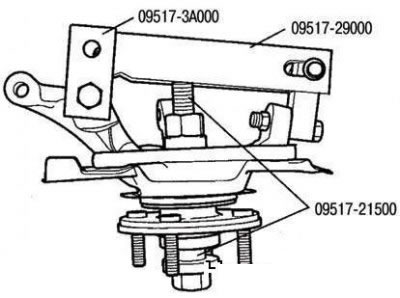
Installing tools 09517-21500 and 09517-29000 for pressing out the hub bearing
Install devices 09517-21500 and 09517-29000.
Press the hub out of the steering knuckle by turning the nut of the 09517-29000 tool.
Remove tools 09517-21500 and 09517-29000 and the mud deflector ring.
Checking the technical condition
Check the hub for cracks and the splines for wear.
Check the brake disc for scoring and other damage.
Check the steering knuckle for cracks.
Check the bearing for cracks and damage.
Apply a thin coat of multi-purpose grease to the mating surfaces of the steering knuckle and bearing outer race.
Using tool 09532-31200A, press the hub bearing into the steering knuckle.
Assembly
Press the inner bearing race out of the hub using tool 09495-33000.
Using tools 09517-02000 and 09977-21811, press the outer ring of the hub bearing out of the steering knuckle.
Note: To avoid damaging the bearing, apply the pressing force to its outer ring.
Replace the hub bearing with a new one each time it is removed.
Install the mudguard ring.
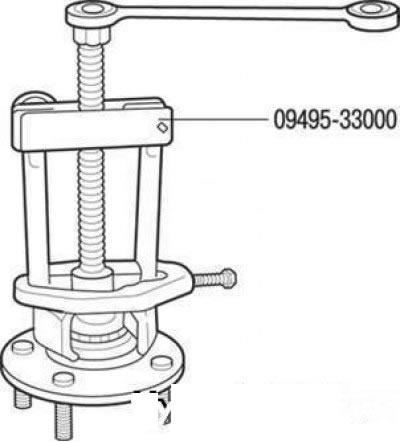
Tool 09495-33100 for pressing the hub into the steering knuckle
Using tool 09495-33100, press the hub into the steering knuckle.
Note: Press in with the support against the inner ring of the bearing to avoid damaging the bearing.
Install the brake disc.
Tighten the hub nut to 200–260 N·m using tool 09517-21500.

Checking the axial clearance in the hub bearing
If after tightening the hub nut the axial clearance in the bearing (Figure 4.24) exceeds the maximum permissible value, then the hub and steering arm bearing are not installed correctly. In this case, disassemble the unit and reassemble it.
The maximum permissible axial clearance in the hub bearing must be no more than 0.008 mm.
Remove tool 09517-21500.
Rotate the hub several times to allow the bearing to self-align.
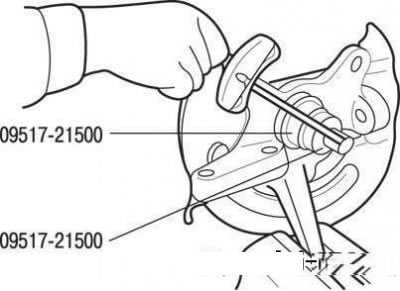
Checking the moment of resistance to rotation of the hub bearing
Check the moment of resistance to turning of the hub bearing.
The maximum permissible moment of resistance to rotation of the hub bearing must be no more than 0.99 Nm.
If the torque is zero, check the bearing axial clearance.