
HyundaiBook.ru
Repair Chevrolet Repair Honda Repair Toyota Repair Land Rover Repair VAZ Repair Renault Repair Nissan
English Русский
Български
Беларускі
Український
Српски
Hrvatski
Română
Polski
Slovenský
Magyar
ArticlesSitemapContacts  


  Accent   Elantra   Getz   Grandeur   Sonata   Santa Fe   Tucson   Others
Sonata 3 (1993-1998) Sonata 4 (2001-2012, petrol)
  • Main
  • Sonata
  • Y3 (1993-1998)
  • General information
  • Maintenance
  • Valve clearance — checking and adjustment

Valve clearance — checking and adjustment (Hyundai Sonata Y3)

0
Since the intake and exhaust valves are equipped with an automatic clearance adjustment mechanism, there is no need to adjust the clearance. If there is valve knocking or any unusual noise, check the mechanism by removing it.

(for vehicles equipped with SOHC engines)

Warning:
  • 1) Before starting this adjustment, the cylinder head bolts should be tightened.
  • 2) If the clearance of the jet valve is not satisfactory, it will not only affect the exhaust gas composition, but may also cause engine malfunction. Therefore, it is important to accurately perform the adjustment as described below.


1. Start the engine and let it warm up until the coolant temperature reaches 80-95°C

2. Check the ignition timing and idle speed, adjusting them if necessary.

3. Remove the valve cover.

4. Remove the front upper cover of the camshaft drive toothed belt.

5. Turn the crankshaft clockwise and align the mark on the camshaft sprocket.

6. Make sure that the valve clearance shown in the diagram is the standard value.

6. Make sure that the valve clearance shown in the diagram is the standard…

6. Make sure that the valve clearance shown in the diagram is the standard…


7. If the valve clearance is within the standard value, loosen the lock nut of the rocker arm adjusting screw. Using a feeler gauge, adjust the valve clearance by turning the adjusting screw.


(The original version is stored on the website: www.HyundaiBook.ru)

8. Without allowing the rocker arm adjusting screw to turn, tighten the lock nut using a screwdriver.

9. Turn the crankshaft clockwise one revolution (360°).

10. Make sure that the valve clearance shown in the diagram is the standard value.
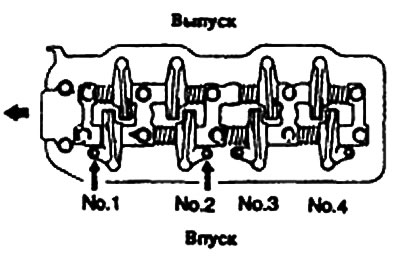
11. Repeat steps 8 and 9 to adjust the clearance of the remaining valves.
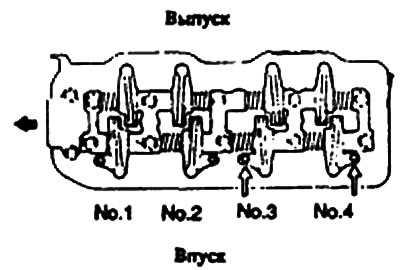
11. Repeat steps 8 and 9 to adjust the clearance of the remaining valves.


12. Apply a layer of sealant to the semicircular sealing areas indicated by the arrows in the figure.

13. Install the front upper timing belt cover.

14. Replace the valve cover.

15. Install the air hose and air tube.
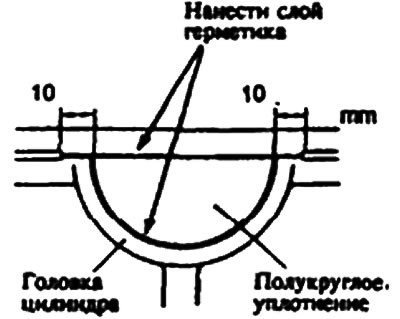
15. Install the air hose and air tube.
This article is available at russian, bulgarian, belarusian, ukrainian, serbian, croatian, romanian, polish, slovak, hungarian
This article has been reviewed by: Konstantin Smirnov
Add to social network:

Previous
Sonata 3: Maintenance
Next

Replacing the engine oil filter
Checking the engine oil level
Recommended lubricants and their consumption
Heavy duty maintenance
Scheduled maintenance
Replacing the air filter
Checking and adjusting belt tension
Engine cooling system
Replacing ignition wires
Replacing the oxygen sensor
We recommend other articles on the topic of Hyundai manuals:

Checking the axial clearance of the rear wheel bearing Hyundai Accent 1 (1994-1999)
Valve Clearance Adjustment — 2.0 Liter Engines (2001-2005) Hyundai Elantra 1 (1990-1995, petrol)
Hydraulic valve clearance compensators Hyundai Getz (2002-2011)
Removal, checking and installation the positive crankcase… Hyundai Santa Fe 2 (2007-2012, petrol)
Checking and adjusting valve clearances Hyundai Tucson 1 (2005-2010)
Checking and adjusting the valve drive clearance Hyundai Matrix (2001-2010, petrol)

Link in different formats to this article

Visitor comments
No comments yet


How much will 12 + 35 ?


Sonata 4 (2001-2012, petrol) 
  • General information
  • User manual
  • Maintenance
  • Power unit
  • 2.0 and 2.4 liter engines
  • 2.7 liter engines
  • Engine overhaul
  • Cooling system
  • Intake and exhaust systems
  • Lubrication system
  • MFI fuel injection system
  • Engine electrical equipment
  • Transmission
  • Clutch
  • Mechanical gearbox
  • Automatic gearbox
  • Drive shafts
  • Chassis
  • Front suspension
  • Rear suspension
  • Steering
  • Brake system
  • Body
  • Exterior
  • Interior
  • Heater and air conditioner
  • Security systems
  • Electrical equipment
  • Troubleshooting
  • Electrical circuits
Sonata 3 (1993-1998) 
  • General information
  • Maintenance
  • Power unit
  • Engine repair I4 DOHC
  • Engine repair I4 SOHC
  • Engine repair V6 SOHC
  • Cooling system
  • Intake and exhaust system
  • Exhaust gas treatment
  • Fuel system
  • Transmission
  • Clutch
  • Mechanical gearbox
  • Automatic transmission KM-175
  • Automatic transmission F4A33
  • Chassis
  • Front suspension
  • Rear suspension
  • Steering
  • Brake system
  • Body
  • Body elements
  • Electrical equipment
  • Equipment and devices
HyundaiBook.ru © 2018-2026 · Mobile version · Sitemap: EN BG BY UA RS HR RO PL SK HU · Administration · Site search · Hyundai owners Accent 1 · Accent 2 · Accent 3 · Elantra 1 · Elantra 2 · Elantra 3 · Getz · Sonata 3 · Sonata 4 · Santa Fe 2 · Tucson 1 · Tucson 2 · Matrix ·
This site uses cookies to optimize its functionality. By continuing, you agree to our terms.