
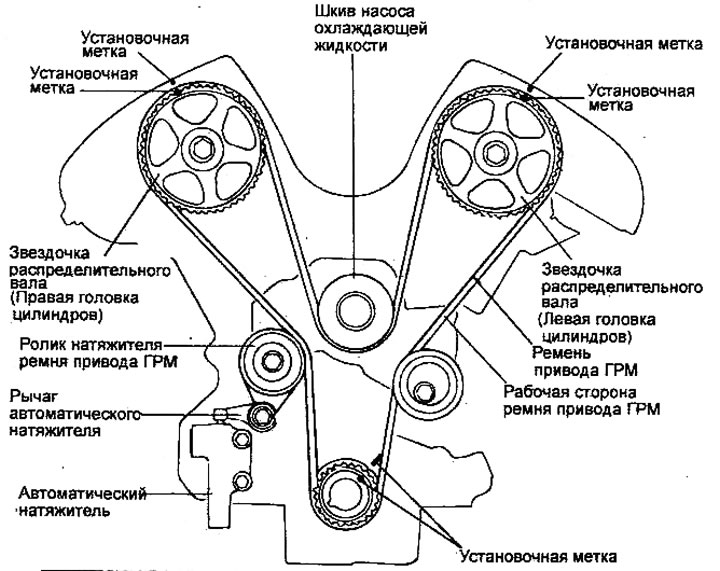
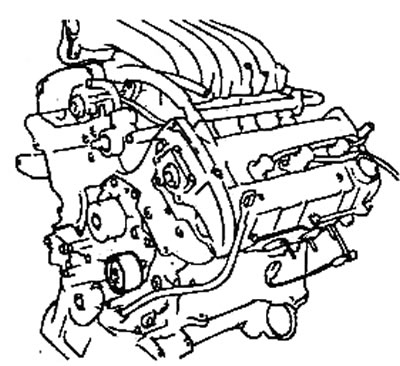
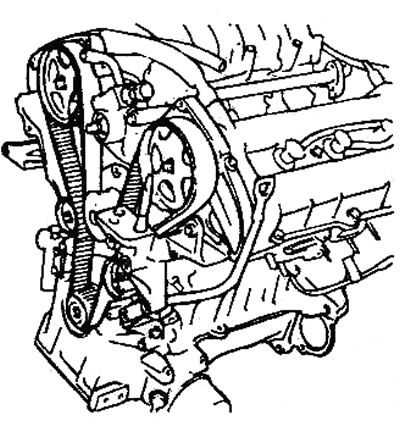
Timing belt - general view.

Timing belt.
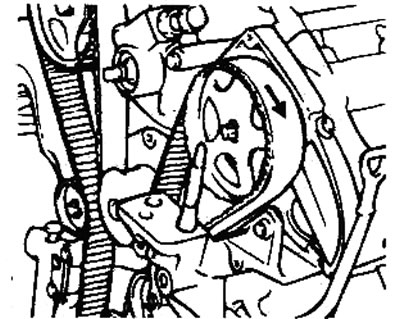
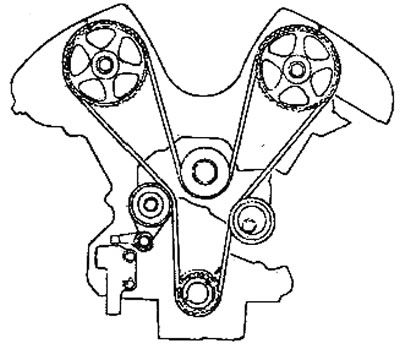
1 - lower timing belt cover, 2 - upper timing belt cover, 3 - side engine support bracket, 4 - lower protective cover, 5 - timing belt, 6 - crankshaft pulley.
Removal
1. Remove the engine noise protection cover.
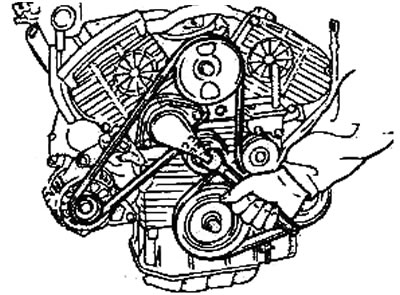
2. Using a 16mm wrench, turn the accessory drive belt automatic tensioner lever clockwise approximately 14 degrees, then remove the belt.
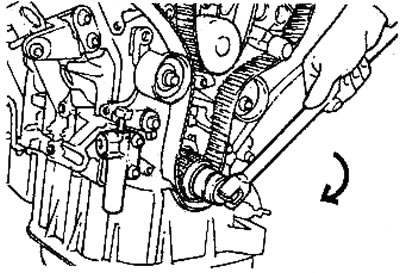
3. Remove the power steering pump pulley and crankshaft pulley, tensioner roller and guide roller.
4. Remove the upper and lower timing belt covers.
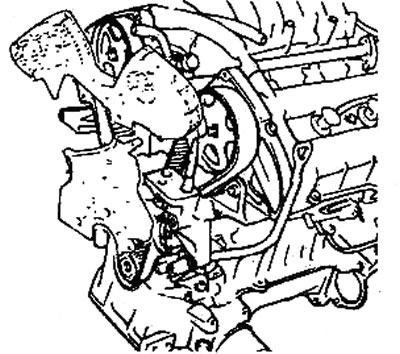
5. Remove the automatic timing belt tensioner.
Caution: Turn the crankshaft clockwise until the timing marks on the crankshaft sprocket and cylinder block are aligned to set the piston of cylinder No.1 to TDC of the compression stroke. In this case, the marks on the camshaft sprockets must be aligned with the corresponding timing marks on the cylinder head cover.
6. Move the tensioner pulley away from the timing belt and secure it, then remove the timing belt.
Note: If the timing belt is reused, it is necessary to mark an arrow with chalk on the reverse (non-working) surface of the belt indicating the direction of rotation, so as not to confuse the direction of rotation when installing the belt.
Examination
Sprockets, timing belt tensioner roller and guide roller
1. Check the camshaft sprocket, crankshaft sprocket, timing belt tensioner pulley and idler pulley for excessive wear, cracks or damage. Replace if necessary.
2. Check the ease and smoothness of rotation of the timing belt tensioner roller and guide roller, and make sure there is no excessive play or extraneous noise when rotating. Replace if necessary.
Installation
Attention:
- Since water or oil can seriously reduce the life of the timing belt, when removing parts, ensure that the timing belt, sprockets and rollers are clean and dry, never wash them. Contaminated parts must be replaced.
- If any of the parts are oily, check for oil leaks through the seals (including the front camshaft seal).
- Check the condition and smooth rotation of the tensioner roller.
- If a used timing belt is being installed, check its condition (see the relevant section in the chapter "Maintenance and general check and adjustment procedures".
1. Install the guide roller onto the coolant pump housing.
Note: Install the guide roller so that it is located near the guide pin, which is pressed into the lug of the coolant pump housing.
2. Install the automatic tensioner lever together with the flat washer onto the cylinder block and tighten its mounting bolt.
- Tightening torque: 35-55 Nm
3. Install the timing belt tensioner roller onto the automatic tensioner lever and tighten its mounting bolt.
- Tightening torque: 43-55 Nm
4. Install the camshaft sprockets and align the sprocket marks with the timing marks.
Note:
- When installing the camshaft sprocket, tighten the sprocket mounting bolt while holding the shaft by the hexagonal portion to prevent it from turning.
- If the camshaft sprocket marks do not align with the timing marks on the cylinder head covers before installing the timing belt, do not turn the camshaft sprocket more than 3 teeth in each direction.
- If the camshaft sprocket turns more than 3 teeth, the valves and pistons may touch.
- If it is necessary to turn the camshaft sprocket more than 3 teeth, carefully turn the crankshaft counterclockwise a certain amount before turning the camshaft sprocket.
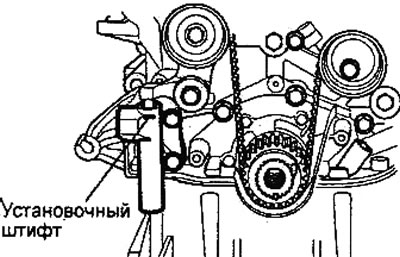
5. Install the automatic timing belt tensioner onto the oil pump housing and tighten its mounting bolts.
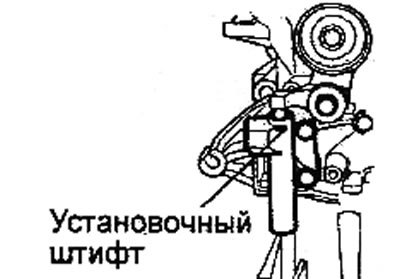
Caution: Before installation, secure the automatic tensioner rod to the housing using the mounting pin.
- Tightening torque: 20-27 Nm
6. Check that all marks are aligned with the timing marks and install the timing belt in the following order: crankshaft sprocket, idler pulley, left cylinder head camshaft sprocket, coolant pump pulley, right cylinder head camshaft sprocket, tensioner pulley.
Note:
- When performing this operation, set the piston of cylinder No.1 to TDC of the compression stroke.
- Be careful not to insert your fingers between the belt and the sprockets, as the sprocket may turn and cause injury.
7. Remove the locating pin from the automatic tensioner.
8. Checking the timing belt tension.
- a) Turn the crankshaft two turns clockwise until the piston of cylinder N91 is at TDC of the compression stroke.
- 6) Leave the crankshaft stationary for five minutes.
- c) Check the protrusion of the automatic tensioner rod. The protrusion of the rod should be within 6-8 mm.
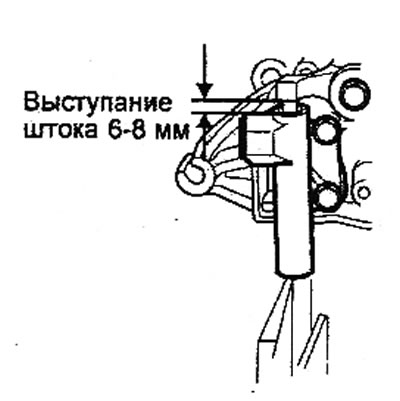
- d) Check that the marks on all sprockets are aligned with the timing marks.
Note: If the sprocket marks are not aligned with the timing marks, repeat the timing belt installation procedure starting from step 6.
9. Install the upper and lower timing belt covers. Tighten their mounting bolts to the specified torque.
- Tightening torque: 10-12 Nm
10. Install the power steering pump pulley, crankshaft pulley, accessory drive belt tensioner roller and idler roller. Tighten the accessory drive belt tensioner mounting bolts to the specified torque.
- Tightening torque: 20-27 Nm
11. Using a 16 mm wrench, turn the accessory drive belt automatic tensioner lever clockwise approximately 14 degrees, then install the accessory drive belt.
12. Install the engine noise protection cover.