
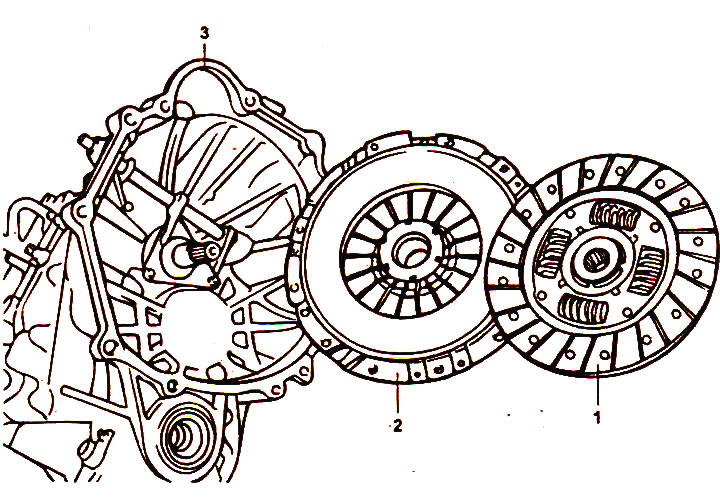
Clutch assembly.
1 - driven clutch disc, 2 - clutch housing, 3 - gearbox.
Removal
1. Disconnect the gearbox from the engine (see chapter "Manual transmission").
2. Remove the clutch release lever.
- a) Unscrew the clutch release lever nut and remove the washer.
[This article is based on information from the website: HYUNDAIBOOK]
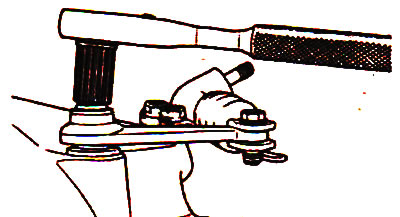
- b) Remove the pin and retaining ring from the clutch release slave cylinder.
- c) Remove the clutch release lever.
Note: It is impossible to remove the gearbox assembly without performing the above operations because the clutch cover, release bearing and clutch release fork are fixed together.
3. Remove the clutch release slave cylinder (see section "Clutch release slave cylinder").
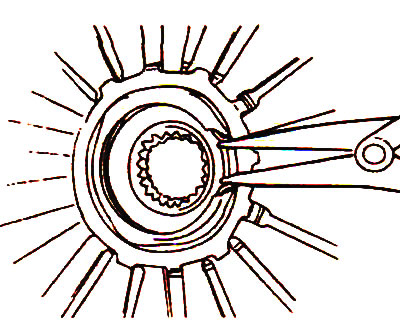
4. Remove the release bearing.
- a) Turn the release bearing in any direction to locate the snap ring lock.
- b) Insert the puller jaws under the knurled washer and center them on the retaining ring.
- c) Spread the ends of the retaining ring by pressing on the bearing as shown in the figure.
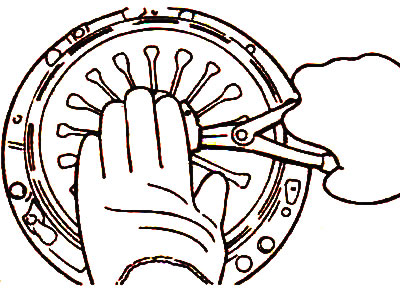
- d) While holding the ends of the snap ring apart, pull the release bearing and remove it.
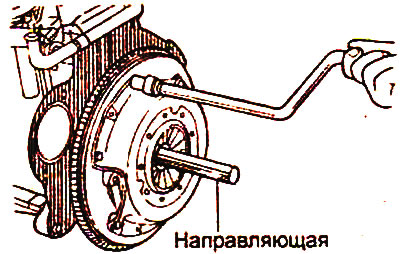
- d) Install the special tool into the clutch driven disc to prevent it from falling.
- e) Loosen the clutch housing to flywheel mounting bolts in a diagonal sequence in several passes. Loosen the mounting bolts no more than one or two turns at a time to avoid damaging the clutch housing.
Caution: Do not clean the clutch disc or release bearing with solvent.
- g) Remove the clutch release fork shaft and bearing.
Examination
1. Check the clutch housing.
- a) Clean the clutch housing from dust using a vacuum cleaner or rag. Do not use compressed air for this purpose. Check for oil leaks through the rear crankshaft oil seal and the front gearbox oil seal. If there are leaks, make the necessary repairs.
- b) The friction surface of the pressure plate must be worn evenly. If any part of the surface of the plate is excessively worn, the pressure plate has not been installed correctly.
Note: Before checking, clean the friction surface of the pressure plate with cleaning solvent.
- c) Check the evenness of the pressure plate surface using a square. If the surface unevenness exceeds the permissible value, replace the pressure plate.
- Maximum permissible value: 0.5 mm
- d) Check the ends of the diaphragm spring petals for wear and symmetry of their mutual arrangement. Replace the spring if there is significant wear or the difference in the mutual arrangement of the petal ends exceeds the maximum permissible value.
- Maximum permissible value: 0.5 mm
- d) Check the surface of the pressure plate for wear, cracks or discoloration.
- e) Check that the rivets securing the housing elements are not loose and, if necessary, replace the clutch housing assembly.
2. Check the flywheel.
- a) Check the flywheel friction surface for discoloration, minor damage, small cracks and wear.
- b) Check that the three flywheel pins are installed correctly.
3. Check the slave disk
- a) Check the friction surface of the driven clutch disc for loose rivets, uneven contact, deterioration in technical condition due to scoring, contamination with oil or grease. Replace the driven disc if defects are present.
Note: Do not touch the clutch disc with dirty hands or gloves. Replace the clutch disc if its surface is contaminated with oil or grease.
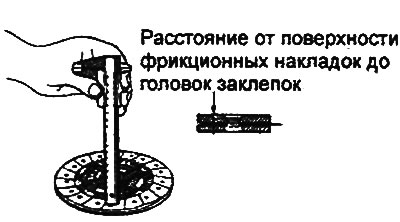
- b) Measure the distance from the surface of the friction linings to the rivet heads of the driven clutch disc and replace the disc if the measured value is less than the maximum permissible value.
- Maximum permissible value: 0.3 mm
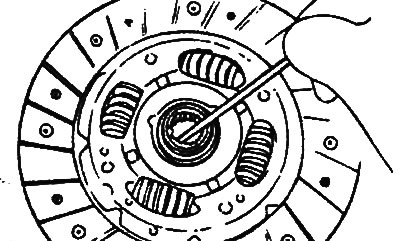
- c) Check the splines and damper springs of the driven clutch disc for excessive wear, play and damage. If defects are present, replace the disc.
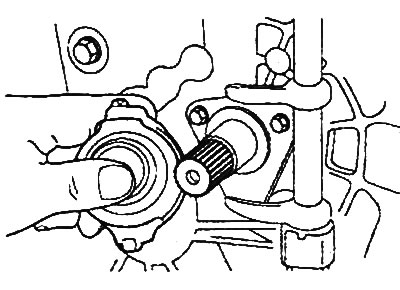
- d) Clean the splines of the gearbox input shaft and install the clutch driven disc. If the clutch driven disc does not move smoothly or there is excessive play, replace the clutch disc and/or the gearbox input shaft.
Diameter (outer / inner) of the clutch driven disc linings:
- for models before 2001:
- with engines with a working volume of:
- 2.0 l: 215/145 mm
- 2.4 L, 2.7 L: 225 / 150 mm
- for models from 2001: 225/150 mm
Thickness of the driven clutch disc (in a free state) along the circumference of the disc linings:
- for models before 2001:
- with engines with working volume:
- 2.0L: 8.2-8.8mm
- 2.4L: 8.4-9.0mm
- for models from 2001: 8.3-8.9 mm
4. Check the release bearing for binding, damage, or abnormal noise when rotating. Also check the contact surface of the release bearing with the diaphragm spring for wear. Replace the bearing if necessary.
Caution: The release bearing is filled with a special grease. Do not wash the bearing with solvent or oil.
5. Check the clutch release fork.
If the contact surface of the release fork with the release bearing is excessively worn, replace the release fork assembly.
Installation
1. Apply grease to the splines of the clutch driven disc hub.
- Lubricant: CASMOLY L9508
Caution: Be careful not to apply too much grease to each part when installing the clutch. Excessive grease may cause the clutch to slip and the car to jerk when engaging the clutch at the start of movement.
2. Using a special tool, install the clutch slave disc onto the flywheel.
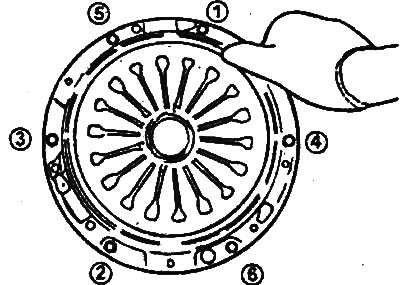
3. Install the clutch cover assembly onto the flywheel and temporarily tighten the mounting bolts in a diagonal sequence in several passes.
- Tightening torque: 15-22 Nm
4. Align the release bearing with the clutch release fork and then install the assembly into the clutch housing bushing.
Caution: Apply general purpose grease or the grease listed below to the bearing bushing and the points where it contacts the release fork.
- Lubricant: CASMOL Y L9508
5. Install the clutch release lever into the clutch release fork.

6. Install the gearbox assembly onto the engine.
7. Press the clutch release lever in the direction of the arrow. If a clicking sound is heard, the release bearing and clutch housing are correctly aligned. If the assembly does not lock into place, perform the operations from step "1" again. The clutch release lever moves within a range of 3° or less.
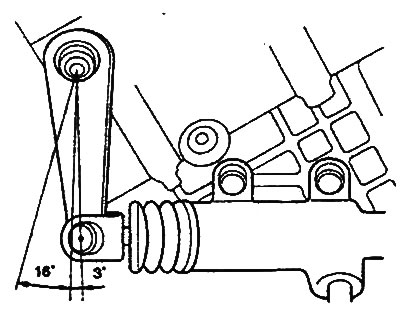
If the lever operating range is more than 3°, the release bearing and clutch housing are not aligned correctly. Press the clutch release lever in the direction of the arrow again.