HyundaiBook.ru
Repair Chevrolet Repair Honda Repair Toyota Repair Land Rover Repair VAZ Repair Renault Repair Nissan
English Русский
Български
Беларускі
Український
Српски
Hrvatski
Română
Polski
Slovenský
Magyar
ArticlesSitemapContacts  


  Accent   Elantra   Getz   Grandeur   Sonata   Santa Fe   Tucson   Others
Getz (2002-2011)
  • Main
  • Getz
  • 1 (2002-2011)
  • Body
  • Air conditioning and heater
  • Compressor shaft seal — removal and installation

Compressor shaft seal — removal and installation (Hyundai Getz 1)

0
Contents: Removal ⇓ Installation ⇓

Removal


To replace the compressor shaft seal, drain the air conditioning system of refrigerant and remove the compressor.

1. Remove the clutch hub from the compressor.

2. Using a sharp tool, remove the felt seal from the front of the compressor.

3. Use low pressure compressed air to remove foreign particles from the cavity of the front part of the compressor and use a lint-free cloth to clean the inside and outside surfaces of the front part of the compressor from oil and dirt.

4. Using a puller, remove the shaft seal retaining ring as follows.
  • 1) Insert the end of the puller into one of the holes of the retaining ring (View A).
  • 2) Turn the puller so that its end and the hole in the retaining ring are located as close as possible to the compressor shaft (view B).
  • 3) Pull the puller sharply upwards, holding its rod against the wall of the bore of the front part of the compressor, remove the retaining ring (view C).

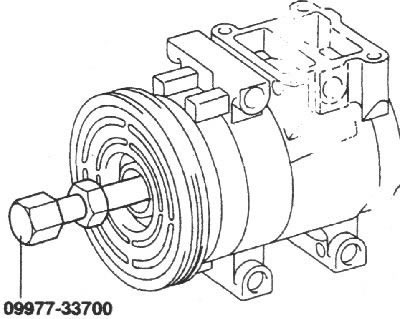
5. Install shaft seal remover tool 09977–33700 onto the compressor shaft and slide it into the front of the compressor until it contacts the shaft seal. Insert the head of the tool into the inside diameter of the shaft seal and, while holding the hexagon of the tool, rotate the handle of the tool clockwise to spread the head of the tool inside the seal and remove the seal by pulling on the tool.

5. Install shaft seal remover tool…


5. Install shaft seal remover tool…


Installation


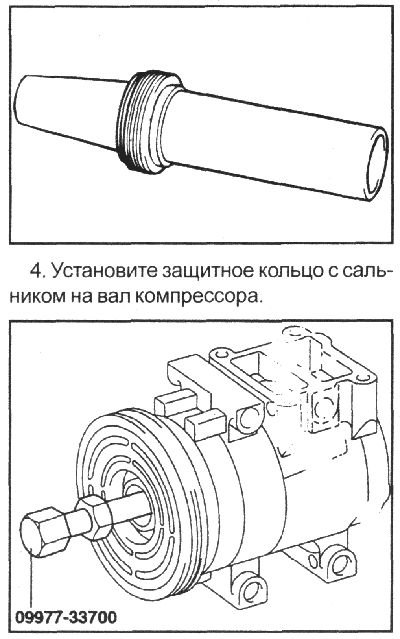
1. Use a new oil seal when installing. Carefully remove the contents from the oil seal kit package and install the plastic oil seal protector ring. Check the protector ring for burrs and other defects.

2. Wipe the shaft and oil seal seat with a clean cloth.

3. Dip the protective ring and seal in clean compressor oil and install the seal on the protective ring with the working edge facing the large diameter of the protective ring.

3. Dip the protective ring and seal in…


5. Install the seal pressing tool onto the end of the protective ring, then slowly slide the seal into the socket.

5. Install the seal pressing tool onto…


6. Remove the seal press mandrel and protective ring from the compressor.

7. Install a new oil seal retaining ring and use a puller to insert it into the groove.


8. Check the tightness of the seal installation by turning the shaft by the coupling hub 10 turns.

9. Install the new felt seal.

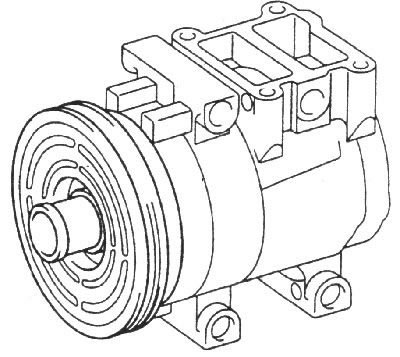
10. Install the clutch hub onto the compressor.
This article is available at russian, bulgarian, belarusian, ukrainian, serbian, croatian, romanian, polish, slovak, hungarian
This article has been reviewed by: Konstantin Smirnov
Add to social network:

Previous
Getz: Air conditioning and heater
Next

Compressor coil — removal and installation
Clutch hub and compressor pulley
Air Conditioning Compressor — Removal and Installation
Evaporator — removal and installation
Air conditioning system air filter
Condenser — removal, inspection and installation
Triple pressure sensor
Heater — removal and installation
Heater Fan — Removal, Checking and Installation
Heater control panel
We recommend other articles on the topic of Hyundai manuals:

Replacing the drive shaft seal Hyundai Accent 1 (1994-1999)
Replacing the drive shaft oil seal ring Hyundai Elantra 3 (2000-2006)
Ball joint and steering seals. Steering and drive shaft boots Hyundai Sonata 3 (1993-1998)
Checking, disassembling and assembling the input shaft Hyundai Santa Fe 2 (2007-2012, petrol)
Cardan shaft — device Hyundai Tucson 1 (2005-2010)
Removal and installation the compressor shaft seal Hyundai Matrix (2001-2010, petrol)

Link in different formats to this article

Visitor comments
No comments yet


How much will 26 + 46 ?


Getz (2002-2011) 
  • User manual
  • Control devices
  • Heating and ventilation
  • Audio system
  • Car driving
  • Faults en route
  • Maintenance
  • Technical information
  • Power unit
  • Engine repair 1.1/1.3 l
  • Engine repair 1.5/1.6 l
  • Lubrication system
  • Cooling system
  • Fuel system
  • Exhaust system
  • Ignition system
  • Transmission
  • Clutch
  • Mechanical gearbox
  • Automatic gearbox
  • Drive shafts and axles
  • Chassis
  • Suspension and wheels
  • Steering
  • Brake system
  • Body
  • Exterior (external elements)
  • Interior (internal elements)
  • Air conditioning and heater
  • Electrical equipment
  • Equipment and devices
  • Power devices
  • Electrical circuits
HyundaiBook.ru © 2018-2026 · Mobile version · Sitemap: EN BG BY UA RS HR RO PL SK HU · Administration · Site search · Hyundai owners Accent 1 · Accent 2 · Accent 3 · Elantra 1 · Elantra 2 · Elantra 3 · Getz · Sonata 3 · Sonata 4 · Santa Fe 2 · Tucson 1 · Tucson 2 · Matrix ·
This site uses cookies to optimize its functionality. By continuing, you agree to our terms.