
Contents: Connection with bolts and nuts ⇓ Flange joints with guide pin ⇓ Compression oil ⇓ Handling oil ⇓ Filling the compressor with oil ⇓ Checking and restoring the…⇓ Topping up oil when replacing parts ⇓ Setting control points ⇓ Draining the refrigerant ⇓
Connection with bolts and nuts

Fig. 8.56. Air conditioning system piping connection
Apply compressor oil to all fasteners to facilitate tightening them sufficiently to ensure a tight seal.
To prevent the pipes from twisting, tighten them using two wrenches.
Tighten threaded connections to the specified torques.
Flange joints with guide pin
Check the presence of the sealing ring, make sure it is not damaged and apply compressor oil to it.
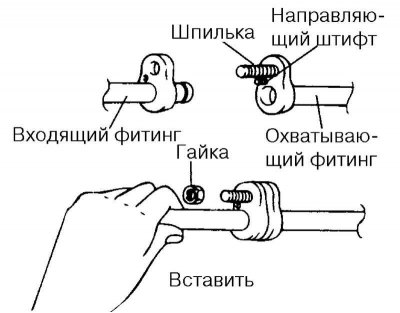
Fig. 8.57. Flange connection installation diagram
Insert the tube as shown in Figure 8.57 and tighten the nut by hand.
Compression oil
The oil for lubricating the compressor circulates in the system during its operation. In all cases where system parts are replaced or a large amount of refrigerant leaks, add oil to restore its original amount.
One-time oil filling: 140–160 g.
Handling oil
Do not allow moisture, dust, metal particles, etc. to enter the oil.
Do not mix oils of different brands.
When oil is exposed to air for a long time, its moisture content increases. After filling and topping up with oil, immediately close the container tightly.
Filling the compressor with oil
Before checking the oil level and adding oil, let the engine idle for 20-30 minutes with the temperature switch set to the position corresponding to the supply of the coolest air to the cabin and the fan switch to the maximum rotation speed, then fill the compressor with oil.
Checking and restoring the compressor oil level
To add oil while the compressor is running, first check the oil level.
Fill the compressor with oil, stop the engine, drain the refrigerant and remove the compressor from the vehicle.
Drain the oil through the system drain plug.
The article is copied from this website: hyundaibook.ru
Note: It is difficult to drain oil from a cold compressor. Before draining the oil, warm up the compressor to approximately 40–50°C.
Determine the amount of drained oil. If it is less than 70 cm³, then there is a small oil leak. Check the tightness of all connections of the system, eliminate the leak or replace faulty parts if necessary.
Check the oil for contamination and restore the level to the specified level as indicated below.

Topping up oil when replacing parts
When replacing system parts, add the following amount of oil to the parts being replaced.

Setting control points
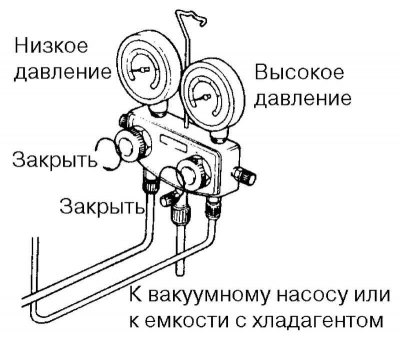
Fig. 8.58. Connecting the filling hoses
Close both gauge adapter valves.
Attention! Observe safety precautions when installing control pressure gauges.
Connect the filler hoses to the adapter fittings. Connect the low-pressure hose to the low-pressure filler fitting, and the high-pressure hose to the high-pressure filler fitting. Tighten the hose fitting nuts by hand.
Note: Fill the system with refrigerant after removing the engine cover and air intake pipe.
Draining the refrigerant
Connect a set of test pressure gauges to the system.
Place a towel under the open end of the center hose.
Drain the refrigerant by slowly opening the high pressure line valve.
Note: If the refrigerant is drained too quickly, compressor oil may be drained from the system.
Check the towel for oil stains. If so, close the valve slightly.
When the pressure gauge reading drops below 3.5 kgf/cm², slowly open the low pressure line valve.
Slowly open the high and low pressure line valves until the pressure gauges show 0 kgf/cm².
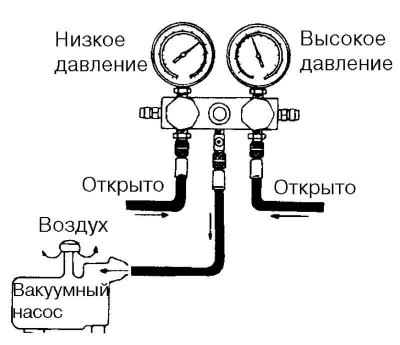
Fig. 8.59. Scheme of installations for draining refrigerant