HyundaiBook.ru
Repair Chevrolet Repair Honda Repair Toyota Repair Land Rover Repair VAZ Repair Renault Repair Nissan
English Русский
Български
Беларускі
Український
Српски
Hrvatski
Română
Polski
Slovenský
Magyar
ArticlesSitemapContacts  


  Accent   Elantra   Getz   Grandeur   Sonata   Santa Fe   Tucson   Others
Sonata 3 (1993-1998) Sonata 4 (2001-2012, petrol)
  • Main
  • Sonata
  • Y3 (1993-1998)
  • Chassis
  • Brake system
  • Brake caliper assembly — removal, disassembly, inspection, assembly and installation

Brake caliper assembly — removal, disassembly, inspection, assembly and installation (Hyundai Sonata Y3)

0
Contents: Removal ⇓ Disassembly ⇓ Examination ⇓ Assembly ⇓ Installation ⇓

Removal


1. Remove the wheel with the tire.

2. Remove the brake hose from the brake caliper.

3. Remove the brake caliper assembly after removing the plate.

Disassembly


1. Loosen the bracket mounting bolts and remove the bracket.

2. Remove the ring cover using a flat-blade screwdriver.

3. Remove the boot from the piston.

4. Remove the piston by blowing compressed air through the hole in the brake hose pipe.

Warning: Your fingers should not be placed in front of the piston when using compressed air.


5. Using a screwdriver, carefully remove the piston seal so as not to damage the cylinder wall.

6. Clean the outer surface of the piston and the inner surface of the cylinder with brake fluid.

Examination


1. Inspect the bracket and the inner surface of the cylinder for wear, defects and/or corrosion.

2. Check the piston for wear, defects and/or corrosion.

3. Check the bracket body for wear.

4. Check the brake linings for deformation and oiling, and the metal backing for damage.

5. Check the wear indicator of the pad for defects.

6. Check the brake disc with a dial indicator and micrometer. Rework the disc or replace it if necessary.

NormLimit value
Disc thickness, mm2220
Disc runout, mm—0,1

Brake caliper assembly — removal,…


7. Replace the brake disc if necessary.


  • 1) Separate the clamping plate from the journal and hang it on the wire.
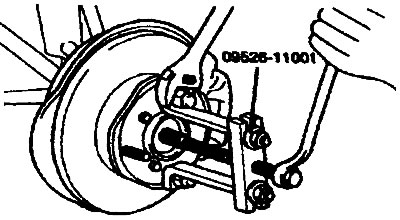
  • 2) Using a special tool (09526-11001) disconnect the drive shaft from the hub and remove the hub brake disc.
  • 3) Install the brake disc and hub assembly onto the axle shaft.
  • 4) Install the drive axle nut and washer and then the drive shaft nut.
    • Tightening torque - 200-260 Nm
  • 5) Install the clamping plate onto the journal.

Assembly


1. Clean the parts with isopropyl alcohol, except for the pads and gasket.

2. Install the piston seal.

3. After applying brake fluid to the outer surface of the piston, install the piston into the cylinder.

4. Install the piston boot into the ring boot.

5. Install the guide pin boots and the guide pin itself.

Installation


1. Install the brake pads and cylinder.

2. Connect the brake hose to the disc brake caliper.
  • Tightening torque of the threaded valve for bleeding the brake is 7-13 Nm

3. Fill the reservoir with brake fluid.

4. Bleed the brake system.
This article is available at russian, bulgarian, belarusian, ukrainian, serbian, croatian, romanian, polish, slovak, hungarian
This article has been reviewed by: Konstantin Smirnov
Add to social network:

Previous
Sonata 3: Brake system
Next

Front Disc Brake — Removal, Checking and Installation
Brake line
Brake booster
Master brake cylinder
Brake pedal
Rear Drum Brake — Removal, Checking and Installation
Rear disc brake
Brake linings
Disc brake caliper
Parking brake
We recommend other articles on the topic of Hyundai manuals:

Front brake caliper Hyundai Accent 2 (1999-2005)
Front Disc Brake Caliper — Disassembly and Assembly Hyundai Elantra 1 (1990-1995, petrol)
Front Brake Caliper — Removal and Installation Hyundai Getz (2002-2011)
High-mounted brake light Hyundai Santa Fe 2 (2007-2012, petrol)
Brake pad wear warning light (optional) Hyundai Tucson 1 (2005-2010)
Disassembly, inspection and assembly of the brake caliper Hyundai Matrix (2001-2010, petrol)

Link in different formats to this article

Visitor comments
No comments yet


How much will 28 + 13 ?


Sonata 4 (2001-2012, petrol) 
  • General information
  • User manual
  • Maintenance
  • Power unit
  • 2.0 and 2.4 liter engines
  • 2.7 liter engines
  • Engine overhaul
  • Cooling system
  • Intake and exhaust systems
  • Lubrication system
  • MFI fuel injection system
  • Engine electrical equipment
  • Transmission
  • Clutch
  • Mechanical gearbox
  • Automatic gearbox
  • Drive shafts
  • Chassis
  • Front suspension
  • Rear suspension
  • Steering
  • Brake system
  • Body
  • Exterior
  • Interior
  • Heater and air conditioner
  • Security systems
  • Electrical equipment
  • Troubleshooting
  • Electrical circuits
Sonata 3 (1993-1998) 
  • General information
  • Maintenance
  • Power unit
  • Engine repair I4 DOHC
  • Engine repair I4 SOHC
  • Engine repair V6 SOHC
  • Cooling system
  • Intake and exhaust system
  • Exhaust gas treatment
  • Fuel system
  • Transmission
  • Clutch
  • Mechanical gearbox
  • Automatic transmission KM-175
  • Automatic transmission F4A33
  • Chassis
  • Front suspension
  • Rear suspension
  • Steering
  • Brake system
  • Body
  • Body elements
  • Electrical equipment
  • Equipment and devices
HyundaiBook.ru © 2018-2026 · Mobile version · Sitemap: EN BG BY UA RS HR RO PL SK HU · Administration · Site search · Hyundai owners Accent 1 · Accent 2 · Accent 3 · Elantra 1 · Elantra 2 · Elantra 3 · Getz · Sonata 3 · Sonata 4 · Santa Fe 2 · Tucson 1 · Tucson 2 · Matrix ·
This site uses cookies to optimize its functionality. By continuing, you agree to our terms.