
Contents: Keys ⇓ Electronic immobilizer – anti-theft…⇓ Emergency operation mode and…⇓ Ignition switch with illumination…⇓ Locking and unlocking the front…⇓ Locking doors from outside the car ⇓ Locking doors from inside the car ⇓ Rear door locking (child protection) ⇓ Central door locking system…⇓ Anti-theft system (additional…⇓ Alarm status ⇓ Disconnection state ⇓ Remote control door lock system…⇓ Replacing the battery ⇓ Back door ⇓ Luggage compartment net ⇓ Luggage compartment protective shelf…⇓ Luggage compartment under the…⇓ Roof rack (additional equipment) ⇓ Remote opening of the fuel filler cap ⇓ Manual release of the fuel filler cap ⇓ Opening the hood ⇓
Keys
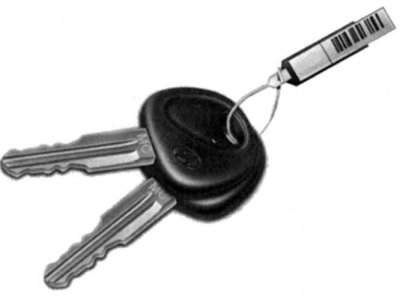
Fig. 1.5. Set of keys for Hyundai SantaFe
For greater convenience, all car locks can be opened with one key (Fig. 1.5).
Since the doors can be locked without using the key, carry a spare key with you that you can use if you accidentally lock the key inside your own vehicle.

Fig. 1.6. Number plate
To prevent unauthorized persons from finding out the key number, it is stamped not on the key itself, but on a removable number plate (Fig. 1.6).
Keep the number plate in a safe place separate from the keys outside the vehicle.
Electronic immobilizer – anti-theft engine start blocking system (additional equipment)
The immobilizer is designed to minimize the likelihood of vehicle theft.
All car locks can be locked and unlocked with one key. Since the doors are locked without using a key, be careful not to accidentally lock the key inside your own car.
Warning! When starting the engine, do not use a key with a different immobilizer code. The engine may not start or may stall shortly after starting.
Emergency operation mode and immobilizer malfunction indicator lamp
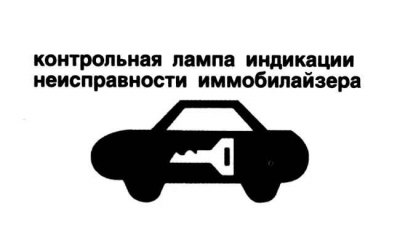
Fig. 1.7. Immobilizer malfunction indicator lamp
If the immobilizer malfunction indicator lamp (Fig. 1.7) flashes for five seconds with the ignition on, the immobilizer is faulty. You will not be able to start the engine without turning on the emergency mode using the ignition key.
Below are described the operations that must be performed to start the engine in emergency mode (numbers 0, 1, 2, 3 are given as an example for the password).
Note: You can find out the password for the emergency operation mode when you receive your new car. If you do not have the password, contact your authorized Hyundai dealer.
1. To enter the password, turn the ignition key to the "ON" position and then to the "OFF" position in accordance with the password numbers. For example, to enter the number "1", turn the ignition key in the specified order once, for the number "2", twice, etc. To enter the number "0", you must turn the ignition key in the specified order ten times.
2. Wait 3 to 10 seconds.
3. Enter the remaining password digits according to points 1–4.
4. If all four digits of the password are entered successfully, start the engine within 30 seconds. After this time, it will be impossible to start the engine.
5. If the immobilizer indicator lamp flashes for 5 seconds, repeat the operations for emergency operation mode.
After switching to emergency mode, contact an authorized Hyundai dealer as soon as possible.
Ignition switch with illumination (additional equipment)
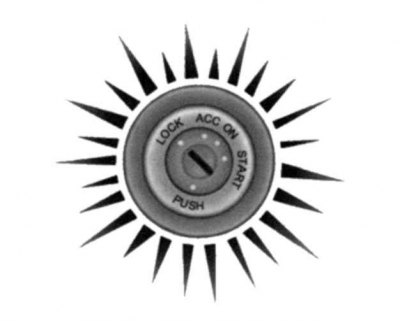
Fig. 1.8. Ignition switch illumination
When the ignition key is in any position other than "ON", the ignition switch light comes on when the door is opened. It goes out approximately 10 seconds after the door is closed or after the ignition key is turned to the "ON" position (Fig. 1.8).
Warning! Driving with unlocked doors is dangerous. Before driving (especially if there are children in the car), make sure that all doors are securely locked and cannot be accidentally opened from inside the car.
Warning! If seat belts are used correctly and the doors are locked, passengers cannot be thrown out of the vehicle in the event of a traffic accident.
Attention! Before opening the door, make sure there is no approaching vehicle.
Attention! In case of an accident, the doors are unlocked automatically (additional equipment).
Warning! Do not lock the doors with the key or remote control until all passengers have left the vehicle. In this case, it is not possible to unlock the door using the door lock switch from inside the vehicle (optional equipment).
Warning! Do not leave children, helpless adults, or pets in a closed vehicle as this may result in heat stroke or even death.
Locking and unlocking the front doors with the key
The door can be locked and unlocked with a key.
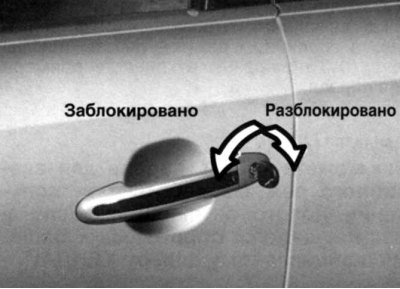
Fig. 1.9. Locking and unlocking the door with a key
To lock the door, turn the key towards the front of the car, and to unlock it, turn the key towards the rear (Fig. 1.9).
Locking doors from outside the car
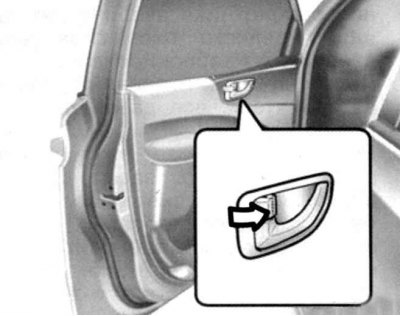
Fig. 1.10. Internal door lock button
The doors can be locked without using the key. To lock the doors from outside the vehicle, set the interior door lock button to the "LOCK" position so that the red mark on the end of the button is not visible, and then close the door. The doors will not be locked if the key is left in the ignition and the front doors are closed. This is considered normal (Fig. 1.10).
Note: When locking the doors, be careful not to leave the ignition key inside the car.
Note: To prevent theft, always remove the key from the ignition, roll up all windows and lock all doors when leaving the vehicle unattended.
Locking doors from inside the car
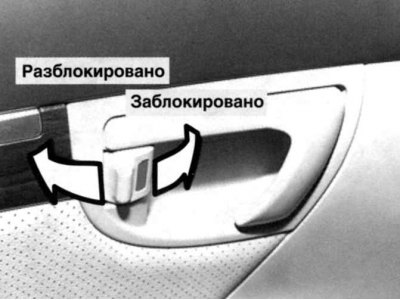
Fig. 1.11. Door lock lock
To lock the doors from inside the vehicle, close the door and set the interior door lock button to the "LOCK" position (Fig. 1.11).
Note: When the door is locked, the red mark on the end of the button will read "LOCK".
Note: The door can be opened from the inside by pulling the handle even when the lock button is in the "LOCK" position.
Rear door locking (child protection)
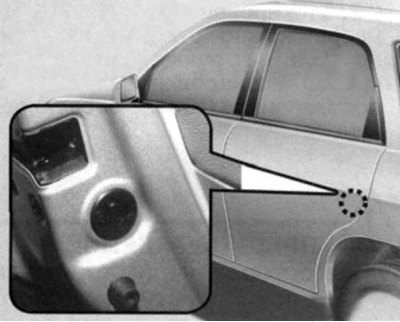
Fig. 1.12. Rear door lock button
The vehicle is equipped with a rear door locking system (child lock). If the locking levers are in the locking position, the rear doors cannot be opened from inside the vehicle. It is recommended to use the rear door locking system if there are small children in the rear seat (Fig. 1.12).
To prevent the rear doors from being opened from inside the vehicle, move the door lock lever to the position
To open the rear door when the lock lever is in the "locked" position, use the outside door handle.
Central door locking system (additional equipment)
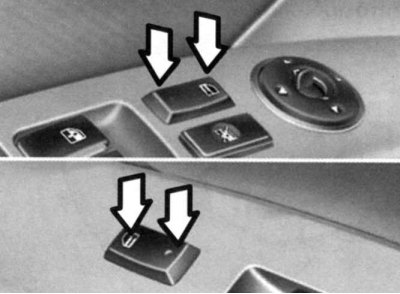
Fig. 1.13. Central door locking button
The central lock switch is located on the armrest of the driver's and front passenger's doors and is controlled by pressing it. If any of the doors is open when the switch is pressed, it will be locked after closing (Fig. 1.13).
Note: When you press the front of the central locking switch on the driver's or front passenger's door armrest, all doors are locked.
Note: Pressing the back of the switch will unlock all doors.
Note: If you pull the inside door lock handle, the driver's and front passenger's doors will be unlocked even if the doors were locked by pressing the front of the central locking switch.
Anti-theft system (additional equipment)
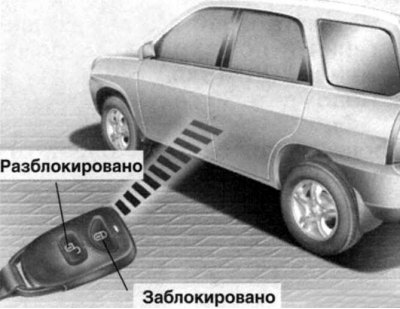
Fig. 1.14. Locking and unlocking using the remote control
This system is designed to prevent unauthorized entry into the vehicle and has three operating modes: "Ready", "Alarm" and "Disable". When the anti-theft system is triggered, the sound alarm (siren) is activated and the direction indicators begin to flash (Fig. 1.14).
Park the vehicle and turn off the engine. Bring the system to the ready state, and as indicated below.
Remove the key from the ignition.
Make sure the hood and tailgate are locked.
Lock the doors using the remote control door lock transmitter.
After completing the above steps, the direction indicators will flash once to indicate that the system is in the ready state.
However, if any of the doors or the hood remain open, the turn signals will not flash. After all the doors and the hood are closed, the turn signals will flash once. The anti-theft system can be activated by closing the front or rear doors with the key. In this case, the turn signals will not flash.
Note: If any of the doors or the hood are open, the system will not be armed. In this case, disarm the system as follows.
Caution: Do not activate the system until all passengers have left the vehicle.
If any door or hood is opened within 30 seconds of the anti-theft system being activated, the system will automatically turn off to prevent unnecessary alarm activation.
Alarm status
The alarm is triggered when the vehicle is parked and the system is in the prepared state in one of the following cases.
Opens the front or rear door without using the transmitter.
The rear door opens without using the transmitter.
The hood opens.
In these cases, the audible alarm (siren) will sound and the direction indicators will flash for 27 seconds. To turn off the system, unlock the side doors or the rear door using the transmitter.
Warning! Do not attempt to start the engine when the anti-theft system is in the ready state.
Disconnection state
The system is deactivated when the driver or passenger door is unlocked by pressing the button
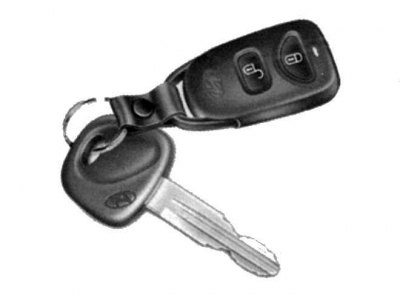
Fig. 1.15. Remote control lock and unlock buttons
After this, the direction indicators will flash twice, indicating that the system is turned off.
Note: If one of the doors or the hood is not opened within 30 seconds, the system will turn on again.
Warning! The system can only be disabled using the transmitter. If the transmitter does not work when the anti-theft system is in the ready state, the following measures must be taken:
- open the door with the key. In this case, the sound alarm (siren) will sound;
- insert the key into the ignition switch and turn it to the "ON" position;
- wait 30 sec.
After this the system will be disabled.
Remote control door lock system (additional equipment)
Locking doors:
1. Close all doors.
2. Press the button
3. The direction indicators will flash once to indicate that the doors are locked.
Unlocking doors:
1. Press the button
2. The direction indicators will flash twice to indicate that all doors are unlocked.
Replacing the battery
When the transmitter battery starts to run low, it may take several button presses to open or close the doors and the indicator light will not light. In this case, replace the battery as soon as possible.
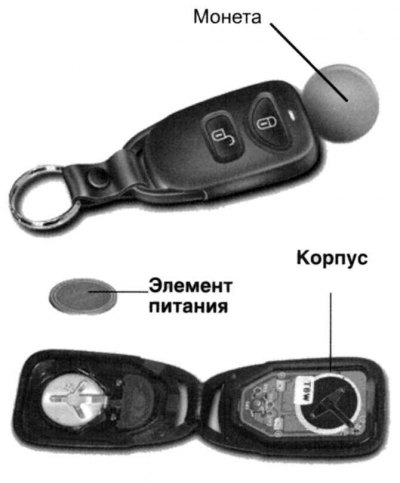
Fig. 1.16. Replacing the battery
To replace the battery, disconnect the transmitter housing using a coin, as shown in the figure (Fig. 1.16).
Remove the old battery from the case, noting the polarity. Make sure the polarity of the new battery is correct (the "+" side should be facing down) and install it.
Note: The transmitter will not work in the following cases:
- the key is in the ignition;
- the distance from the transmitter to the car is more than 10 m;
- the battery in the transmitter is discharged;
- other cars or objects are blocking the signal;
- ambient temperature too low;
- the transmitter is located near radio stations, airports or other objects that generate high-frequency radiation that may interfere with its normal operation.
If the transmitter does not work, open and close the door with the key. Contact an authorized Hyundai dealer to repair the transmitter.
Do not allow water to enter the transmitter housing. In case of transmitter failure due to water or any liquids, the warranty obligations for repair or replacement of the transmitter do not apply.
Back door
The rear door is raised manually by pulling the outer door handle towards you.
Warning! When the vehicle is moving, the rear door must always be completely closed. If it is open or slightly open, toxic exhaust gases may enter the vehicle, which may result in poisoning or death of passengers.
To close the tailgate, lower it and push it until it is completely closed. To ensure that the tailgate is completely closed, try opening it without using the outside handle.
Luggage compartment net
The luggage compartment net is used to secure cargo in the luggage compartment.
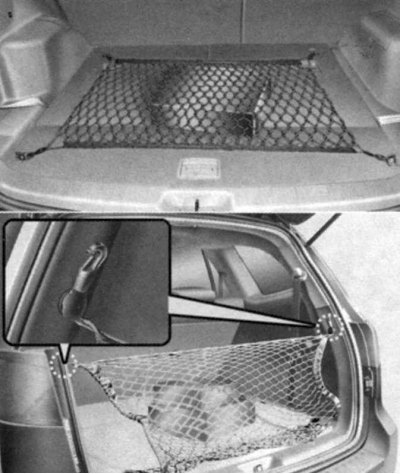
Fig. 1.17. Eyelets for fastening the luggage compartment net
Use the luggage compartment net by attaching it to the four eyelets as shown in Figure 1.17.
Please note: Be careful when transporting fragile and large items in the luggage compartment.
Warning! Avoid damaging the eyes. Do not over-tighten the luggage compartment net. Do not use a net that shows visible signs of wear or damage.
Luggage compartment protective shelf (additional equipment)
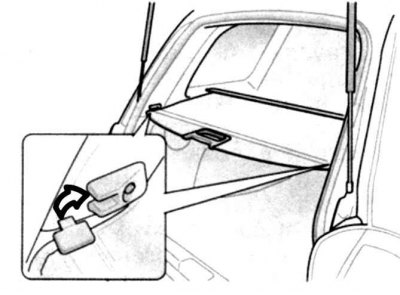
Fig. 1.18. Luggage compartment protective shelf
To use the luggage compartment protective shelf, pull it out of the cassette and secure the latch in the lock as shown in Figure 1.18.
Precautions when using the luggage compartment protective net
Do not place luggage on the luggage compartment protective net. In the event of a traffic accident (crash) or sudden braking, the luggage may shift and cause injury to passengers and the driver.
To save fuel, do not overload your car with unnecessary luggage.
Never allow passengers to be in the luggage compartment while the vehicle is moving. The luggage compartment is used only for carrying luggage.
When loading luggage, try to place it as close to the front of the luggage compartment as possible.
Luggage compartment under the luggage compartment tray
This versatile luggage compartment is located under the luggage compartment tray.
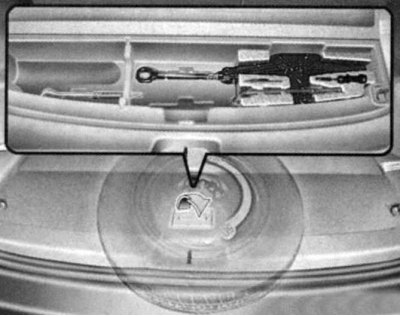
Fig. 1.19. Luggage compartment tray
To use it, you need to lift the luggage compartment tray using the special handle (Fig. 1.19).
Roof rack (additional equipment)
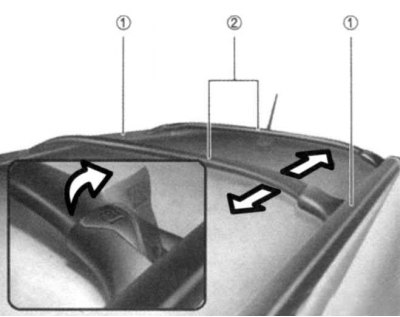
Fig. 1.20. Crossbar movement: 1 – longitudinal mounting rack of the luggage rack; 2 – crossbar
The vehicle may also be equipped with a roof rack. Pull the locking lever up to move the crossbar to the desired position and lower the lever to securely fix the crossbar (Fig. 1.20).
Attention! The crossbars must be placed in such a way as to ensure an even load on the longitudinal mounting posts of the luggage rack, depending on the weight and dimensions of the luggage being transported.
Caution! If the vehicle is equipped with a sunroof, do not place luggage in the sunroof opening area to avoid damaging the drive mechanism and the sunroof itself.
Caution! When transporting cargo on the roof rack, be careful not to damage the roof of the car.
Attention! When transporting large-sized cargo on the luggage rack, make sure that the dimensions of the cargo do not exceed the dimensions of the car roof.
Remote opening of the fuel filler cap
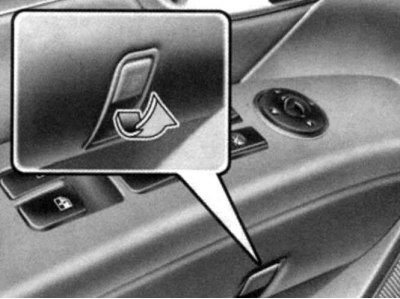
Fig. 1.21. Fuel tank filler cap opening lever
The fuel filler cap can be opened from inside the vehicle by pulling up on the cap release lever located on the driver's door (Fig. 1.21).
Note: If you cannot open the fuel filler cap due to ice, lightly tap or press on the cap to break the ice and open the cap. If necessary, use an approved de-icer spray (do not use coolant antifreeze) or move the vehicle to a heated area until the ice melts.
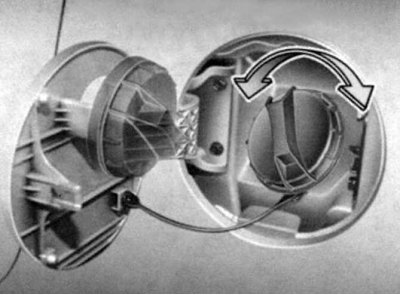
Fig. 1.22. Fuel tank filler cap
Warning! Gasoline vapors are poisonous. Always turn off the engine before refueling. When handling fuel, ensure that there is no open flame nearby. If the filler cap needs to be replaced, install only the original Hyundai cap that is designed for your vehicle brand. Sometimes, when unscrewing the cap at high ambient temperatures, a slight "hissing" sound can be heard. This is normal (Fig. 1.22).
When opening the fuel filler cap, turn it slowly. Fuel for internal combustion engines is a flammable / explosive substance. Therefore, when filling with fuel, to avoid serious injuries, burns, as well as to prevent fuel ignition, fire, explosion, always follow these recommendations:
- before refueling, pay attention to the location of the emergency exit from the gas station;
- before touching the fuel nozzle or fuel filler cap, ensure that there is no potentially dangerous static electricity by touching a metal part at the front of the vehicle, away from the fuel pump nozzle, with your hand.
When refueling, do not return to the vehicle. Do not touch or rub any synthetic materials (polyester, nylon, etc.) that can cause a static discharge that can ignite fuel vapors and cause an explosion.
When pouring fuel into a container, make sure it is on the ground. A discharge of static electricity from the container can ignite fuel vapors and cause a fire.
The canister must be "grounded" until the fuel is finished. Use only a canister designed for transporting and storing fuel.
Always turn off the engine when refueling. Sparks from the engine's electrical system could ignite fuel vapors and cause a fire. Always make sure the engine is turned off before refueling. After refueling, check that the fuel filler cap and door are tightly closed before starting the engine.
Do not light anything near a petrol station. Do not use matches or a lighter and do not smoke in the car while refueling. Smoking is strictly prohibited at a petrol station. Fuel is highly flammable.
If a fire occurs while refueling, leave the vehicle immediately, move as far away from it as possible and report the fire to the gas station staff or call the emergency services.
Manual release of the fuel filler cap
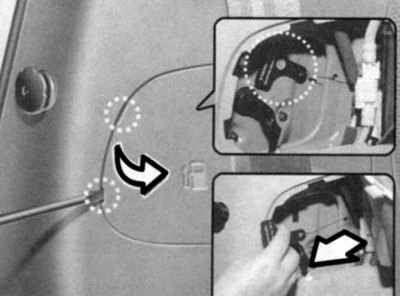
Fig. 1.23. Manual release of the fuel tank filler cap
If it is not possible to open the lid remotely using the button, use the manual release handle located in the luggage compartment. To open the lid, open the plastic panel, pull the handle as shown in Figure 1.23.
Opening the hood
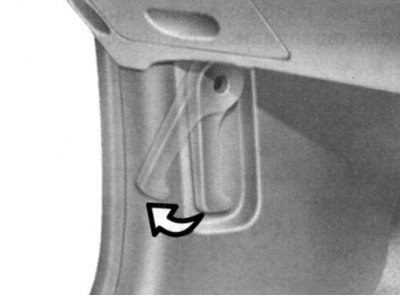
Fig. 1.24. Hood lock drive handle
To open the hood, pull the hood lock handle towards you (Fig. 1.24).
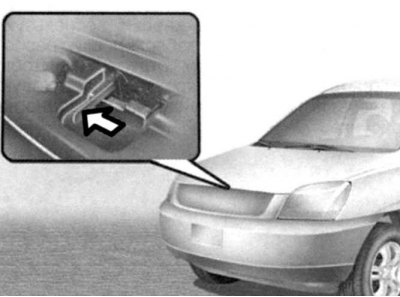
Fig. 1.25. Safety lever
Press the safety lever (Fig. 1.25).
Open the hood.
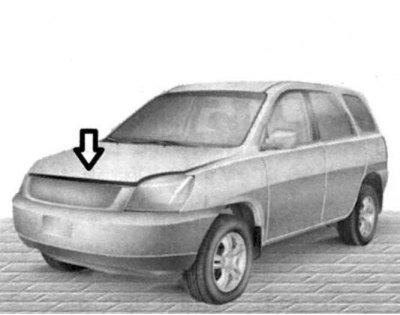
Fig. 1.26. Closing the hood
When closing the hood, slowly lower the hood and make sure that its latch is securely closed (Fig. 1.26).
Warning! Before driving, make sure that the hood is securely closed. A hood that is not completely closed may suddenly open while the vehicle is moving, which will result in complete loss of visibility and, in turn, may cause a traffic accident (crash).
Warning! Do not move the vehicle with the hood open, as this will obstruct your view and the hood may fall and be damaged.