
Contents: Fuel level indicator ⇓ Coolant temperature gauge ⇓ Tachometer ⇓ Speedometer ⇓ Odometer/Tripmeter ⇓ Trip computer (additional equipment) ⇓ Mode switch ⇓ Reset button ⇓ Trip meter (km or miles) ⇓ Mileage on fuel remaining in the tank ⇓ Average fuel consumption in l/100 km…⇓ Outside air temperature (Celsius or…⇓
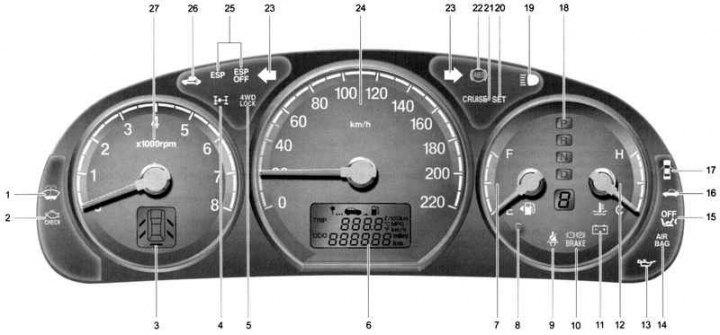
Fig. 1.28. Instrument cluster of the Hyundai SantaFe: 1 – Low fluid level indicator lamp in windshield washer reservoir; 2 – Malfunction Indicator Lamp (MIL) (optional); 3 – Door open alarm display (additional equipment); 4 – All-wheel drive malfunction indicator lamp (additional equipment); 5 – All-wheel drive indicator lamp (additional equipment); 6 – odometer (trip counter) / daily mileage counter / trip computer (additional equipment); 7 – fuel level indicator; 8 – Fuel reserve indicator lamp; 9 – Seat belt reminder (for driver); 10 – Parking brake/brake fluid emergency level indicator lamp; 11 – Low battery indicator lamp; 12 – coolant temperature indicator; 13 – Oil pressure indicator lamp; 14 – Supplemental Restraint System (SRS) Malfunction Indicator Lamp (optional equipment); 15 – Front passenger airbag off indicator lamp (additional equipment); 16 – Rear door open warning light; 17 – Door open signal indicator light; 18 – Automatic transmission selector position indicator lamp (only for models with automatic transmission); 19 – High beam indicator lamp; 20 – Cruise control parameters activation indicator lamp (additional equipment); 21 – Cruise control indicator lamp (automatic cruise control system) (additional equipment); 22 – Anti-lock brake system (ABS) malfunction indicator lamp (additional equipment); 23 – direction indicators; 24 – speedometer; 25 – Electronic Stability Program (ESP) indicator lights (optional); 26 – control lamp indicating immobilizer malfunction (additional equipment); 27 – tachometer
The instrument cluster of the Hyundai SantaFe is shown in Figure 1.28.
Direction indicator lamps
The green arrow on the instrument panel indicates the direction of the turn. If the arrow lights up but does not flash, flashes too quickly, or does not flash at all, this indicates a fault in the turn signal circuits.
Anti-lock brake system malfunction indicator lamp (ABS) (SRI)
After turning the ignition key to the "ON" position, the anti-lock brake system malfunction indicator lamp comes on (ABS SRI) and then goes out after a few seconds. If the light remains on, comes on while driving, or does not come on after turning the ignition key to the "ON" position, this indicates a malfunction in the anti-lock brake system (ABS).
In this case, you should contact an authorized Hyundai dealer as soon as possible to check the car. The standard braking system will continue to work, but without the help of the anti-lock braking system (ABS).
Caution! If the anti-lock brake system malfunction indicator lamp (ABS SRI) and the parking brake/brake fluid level warning lamp remain on after the engine has been started or come on while the vehicle is moving, there may be a malfunction in the EBD (Electronic Brakeforce Distribution) system.
Electronic Stability Program (ESP) warning lights (optional)
The traction control indicator lamps operate in different modes depending on the position of the ignition switch and the state of the system (ESP) – operating or disabled.
They light up when the ignition key is turned to the "ON" position, but go out after three seconds.
High beam indicator lamp
This indicator lamp comes on when the high beam headlights are on or when the headlights are flashing.
Oil pressure warning light
Driving with low engine oil or with the oil pressure warning light on can cause engine failure (scuffing, seizure, etc.). If this light comes on while the engine is running, the engine oil pressure is below the minimum permissible value. In good condition, this light comes on when the ignition key is turned to the "ON" position and goes out after the engine starts. If the light remains on after the engine starts, there is a serious engine malfunction.
In this case, immediately stop the car in a safe place, turn off the engine and check the oil level. If it is below the minimum acceptable level, add oil to the engine to the normal level and start the engine again. If the lamp remains on after starting the engine, turn it off immediately.
Parking brake/brake fluid level warning light
The parking brake/brake fluid level warning light comes on when the parking brake is applied and the ignition key is turned to the "ON" or "START" position. After the engine starts, the light goes out when the parking brake is released. When the parking brake is released, the parking brake/brake fluid level warning light comes on when the ignition key is turned to the "ON" or "START" position and goes out when the engine starts. If this light comes on at any other time, slow down and stop the vehicle completely at the side of the road in a safe place.
The brake system warning light indicates that the brake fluid level in the brake hydraulic system reservoir has dropped below the minimum permissible level and it is necessary to top up with DOT3 or DOT4 brake fluid.
The car is equipped with a dual-circuit diagonal braking system. It ensures braking with both wheels even if one of the brake system circuits is damaged. In this case, stopping the car will require more force on the brake pedal and a longer stroke. Moreover, the braking distance of the car will be increased. In case of failure of one of the brake system circuits, engage a lower gear to use the engine braking effect to stop the car.
Low battery indicator light
This lamp lights up when the ignition key is in the "ON" position and goes out after the engine starts. If the indicator lamp remains on after the engine starts, there is a fault in the charging system. If the lamp lights up while the car is moving, stop the car immediately and look under the hood. First, check the integrity of the alternator drive belt; if it is intact, check its tension.
Warning! If the alternator drive belt becomes loose or breaks while the vehicle is moving, it can cause serious engine damage. The engine may overheat because this belt also drives the engine coolant pump.
Door open warning light
This lamp lights up when one of the side doors is not closed or is not closed tightly.
Rear lid open warning light (optional)
This lamp lights up when the rear door is not closed or is not closed properly.
Door open alarm display (optional)
The display shows the position of any door that is not closed or not closed tightly. The display will go out when all doors are closed tightly.
Fuel reserve indicator light
This light comes on when the fuel level in the fuel tank reaches the minimum reserve level. When this light comes on, it means that you need to refuel as soon as possible. Driving the vehicle with the fuel reserve light on or when the fuel level is below the "E" (Empty) mark may cause misfires and damage the catalytic converter.
Additional passive restraint system malfunction indicator lamp (SRS) (SRI)
This indicator light (SRI) comes on and flashes for approximately 6 seconds after the ignition switch is turned to the "ON" position or after the engine is started, and then goes out.
This indicator light also comes on if there is a malfunction in the supplemental restraint system (SRS). If the indicator light (SRI) does not come on or remains on after flashing for approximately 6 seconds after the ignition switch is turned to the "ON" position or comes on while the vehicle is being driven, take the vehicle to the nearest service station to have the supplemental restraint system (SRS) checked.
Malfunction Indicator Lamp (MIL) (Optional)
This lamp lights up when a malfunction is detected in the components (parts) related to emission control systems. This lamp also lights up when the ignition key is turned to the "ON" position and then goes out after a few seconds. If the lamp lights up while the vehicle is moving or does not light up after the ignition key is turned to the "ON" position, take the vehicle to the nearest service station to have the systems checked.
Cruise control indicator light (automatic vehicle speed control system) (optional equipment)
The cruise control indicator light comes on when you press the cruise control switch located on the steering wheel.
This indicator lamp goes out when the cruise control switch is pressed again.
Control lamp for activating cruise control parameters (automatic vehicle speed maintenance systems) (optional equipment)
The cruise control (automatic cruise control) parameter activation indicator lamp lights up when the cruise control "COAST/SET" or "RES/ACCEL" switch is pressed. The indicator lamp goes out when the "CANCEL" switch is pressed and does not light up when the system is switched off.
All-wheel drive malfunction indicator lamp (additional equipment)
This lamp comes on when the ignition key is in the "ON" position and then goes out after a few seconds.
Caution: If the 4WD (ES) malfunction indicator lamp flashes while the vehicle is being driven, this indicates a malfunction in the 4WD system.
All-wheel drive indicator lamp (optional)
The all-wheel drive indicator light on the instrument panel comes on when you press the all-wheel drive switch.
The purpose of engaging all-wheel drive is to increase traction when driving on dry roads with poor surfaces, on snowy or icy roads and off-road.
When the switch is pressed again, the all-wheel drive indicator lamp goes out.
Warning! Do not use all-wheel drive when driving on highways and expressways: this causes unnecessary noise, vibration and may lead to damage to transmission parts and assemblies.
Front passenger airbag deactivation indicator lamp (additional equipment)
The front passenger air bag deactivation indicator lamp comes on for 6 seconds after the ignition key is turned to the "ON" position or after the engine is started, and then goes out.
The indicator lamp also comes on when the front passenger airbag is turned off by the switch to the "OFF" position and goes out when the switch is returned to the "ON" position.
Caution! If the front passenger airbag switch is faulty, the indicator lamp will not light. The front passenger airbag will deploy in a frontal impact even though the switch is in the "OFF" position.
Immobilizer malfunction indicator lamp (additional equipment)
This indicator light comes on for a few seconds after you turn the ignition key to the "ON" position. You can then start the engine. The light goes out when the engine is running. If the light goes out before you start the engine, turn the ignition key to the "LOCK" position and start the engine again. If the light flashes for five seconds when you turn the ignition key to the "ON" position, this indicates a malfunction in the immobilizer system.
Windshield washer fluid reservoir low level indicator light
The low windshield washer fluid level indicator lamp comes on when the fluid in the reservoir is completely empty.
If the light comes on, fill the windshield washer reservoir with fluid at the first opportunity.
Seat belt reminder indicator (except EU countries)
The seat belt reminder indicator light stays on for 6 seconds after the ignition switch is turned from the "OFF" position to the "ON" position.
Brake pad wear warning sound
The front disc brake pads have wear indicators that make a high-pitched squealing sound when the pad is completely worn out, signaling the need to replace the front brake pads. While the car is moving, this sound may appear and disappear or be constant. It can also be heard when pressing hard on the brake pedal. If you drive with worn brake pads, you can damage the expensive brake disc.
Parking brake warning buzzer (optional)
If the vehicle moves at a speed of more than 3 km/h for 2-3 seconds and the parking brake is applied, a warning buzzer sounds.
Audible signal of high vehicle speed (optional equipment)
When the vehicle speed exceeds 120 km/h, a warning sound is heard.
Fuel level indicator
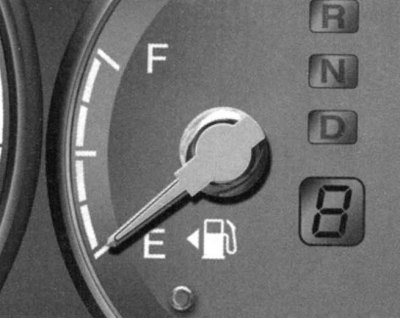
Fig. 1.29. Fuel level indicator
The arrow of this indicator shows the approximate fuel level in the fuel tank (Fig. 1.29).
Coolant temperature gauge
The arrow of this indicator must be within the normal range.
Warning! Do not open the radiator cap while the engine is hot. The cooling system is under pressure and opening the cap may cause hot fluid to spray out and cause severe burns. Wait until the engine has cooled before opening the radiator cap.
If the pointer of the indicator enters the "H" ("Hot") zone of the scale while the engine is running, stop the car immediately and turn off the engine.
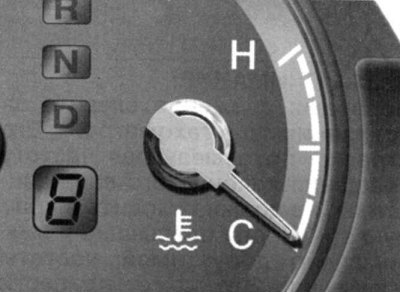
Fig. 1.30. Coolant temperature gauge
Open the hood and check the coolant level in the expansion tank and the coolant pump drive belt (Fig. 1.30).
Tachometer
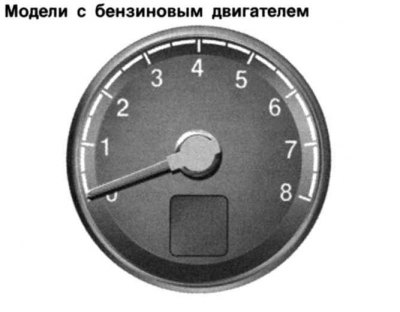
Fig. 1.31. Tachometer
The tachometer shows the engine crankshaft speed in revolutions per minute (rpm) (Fig. 1.31).
Attention! While driving, watch the tachometer readings. Its needle, which shows the engine crankshaft speed, should not enter the red zone (the zone where the maximum permissible speed is exceeded). This can lead to serious engine damage.
Speedometer
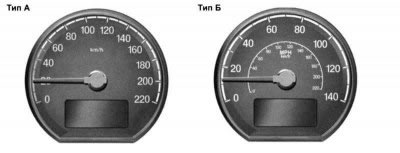
Fig. 1.32. Speedometer
The speedometer shows the vehicle's speed in kilometers per hour (km/h) or miles per hour (Fig. 1.32).
Odometer/Tripmeter
Odometer:
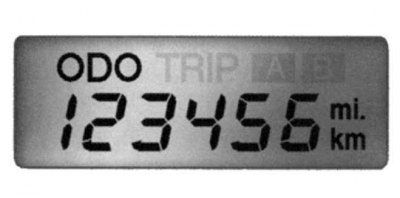
Fig. 1.33. Odometer readings
The electronic odometer shows the total distance in kilometers or miles traveled by the vehicle and is useful for recording periodic maintenance intervals. For a new vehicle, an odometer reading of 240 km is normal (Fig. 1.33).
When the "TRIP" switch is pressed with the ignition key in the "ON" position, the display shows the distance traveled in kilometers or miles.
Trip meter:
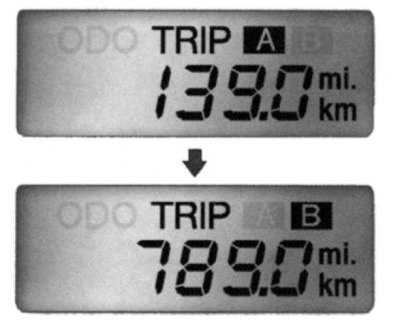
Fig. 1.34. Trip meter
To switch from reading A to reading B, press the "TRIP" button (Fig. 1.34).
Display A: Displays the distance traveled by the vehicle since the start of the current trip.
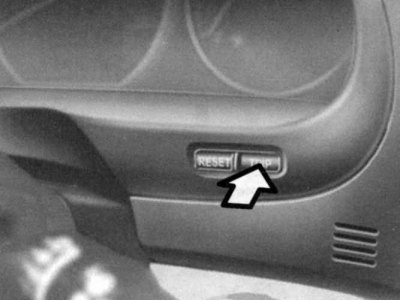
Fig. 1.35. The "TRIP" button
Display B: displays the vehicle's mileage after any intermediate point during the current trip (Fig. 1.35).
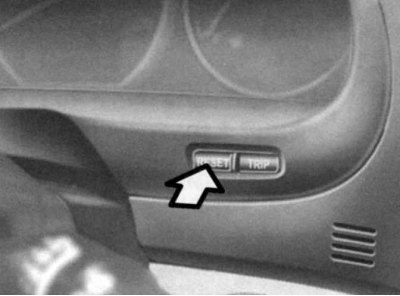
Fig. 1.36. "RESET" button
To reset the trip meter readings, press and hold the "RESET" switch for more than 1 s (Fig. 1.36).
Trip computer (additional equipment)
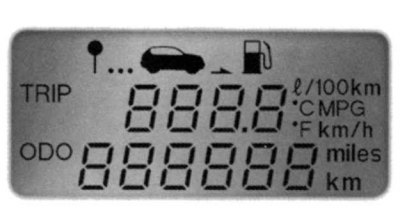
Fig. 1.37. Trip computer display
A trip computer is an electronic device that displays trip information on a liquid crystal display (Fig. 1.37).
Mode switch
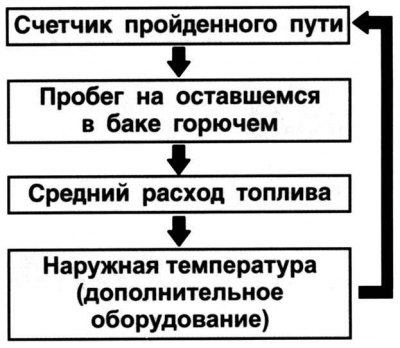
Fig. 1.38. Mode switching diagram
When the TRIP switch is pressed with the ignition key in the ON position, the display will show information in the order shown in Figure 1.38.
Reset button
To reset the displayed information, press and hold the "RESET" switch for more than 1 s.
Trip meter (km or miles)
In this mode, the total distance traveled since the last reset is determined. This indicator is also reset when the battery is disconnected. To reset the distance traveled, press and hold the "RESET" button for more than 1 second while the distance traveled is displayed.
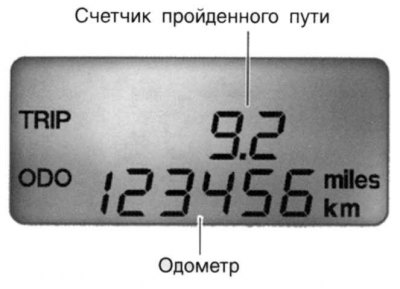
Fig. 1.39. Counter readings
The range of the trip meter readings is from 0 to 999.9 km (Fig. 1.39).
Mileage on fuel remaining in the tank
This mode shows the estimated mileage on the remaining fuel in the tank.
If at least 6 liters of fuel is added to the tank, the trip computer detects that the fuel has been added.
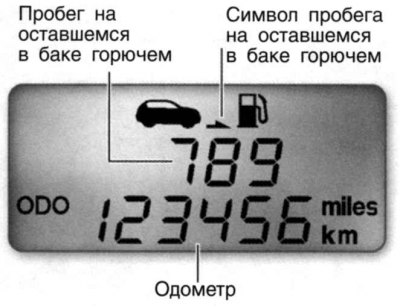
Fig. 1.40. Indications of the mileage mode on the remaining fuel in the tank
If the mileage on the remaining fuel in the tank is estimated to be less than 50 km, the symbol (––) starts flashing on the display, and the mileage figures go out until the tank is refilled (Fig. 1.40).
Note: The mileage information on the remaining fuel in the tank may differ from the actual mileage due to changes in driving conditions.
Note: Range information may vary depending on driving conditions, driving style and speed.
Average fuel consumption in l/100 km or MPG (miles per gallon)

Fig. 1.41. Average fuel consumption mode readings
In this mode, the average fuel consumption is determined based on the amount of fuel consumed and the mileage since the last reset of the average consumption value (Fig. 1.41).
The material is republished from the web portal HyundaiBook.ru
The total fuel consumption is determined when the corresponding signal is received.
The average fuel consumption value is reset to zero when the battery is disconnected.
To reset the average fuel consumption display (––), press and hold the "RESET" button for more than 1 second. If the vehicle has traveled less than 0.5 km (0.5 miles) after resetting, the average fuel consumption display will be displayed as "––".
Outside air temperature (Celsius or Fahrenheit) (optional)

Fig. 1.42. Outdoor air temperature readings
In this mode, the device displays the outside air temperature in the range from –40°C (–40°F) to 75°C (167°F) (Fig. 1.42).