Contents: Key points of operation ⇓ Basic adjustments ⇓ Radio ⇓ Tape recorder ⇓ CD player ⇓ Antenna ⇓
Radio tape recorder.
Note: For a description of the switches, see the Radio and CD Player section.
Key points of operation
Note: The location of the switches is shown in the "Radio" figure.
1. The quality of radio signal reception may vary significantly while the vehicle is moving due to terrain features, weather conditions and proximity to sources of electromagnetic radiation.
Note: the more distance from the transmitting antenna of the radio station the signal power decreases. For the FM range the zone of confident reception is within 20-25 km in the "Stereo" mode and 30-40 km in the "Mono" mode.
Note: For a description of the switches, see the Radio and CD Player section.
2. Audio cassette player.
- a) Clean the tape drive mechanism of the radio with a cleaning cassette approximately once a month. This will ensure constant playback quality.
- b) It is not recommended to use 120-minute cassettes, since due to the small thickness of the film there is a risk of damage to the film or its winding on the elements of the tape-transport mechanism.
- c) Do not expose audio cassettes to high temperatures, such as by placing the cassette under the windshield. This may cause deformation of the cassette body.
3. CD player.
- a) In cold weather or at high humidity, due to fogging of the disc surface and optical elements of the player, playback failures are possible. After normalization of humidity, the operation of the audio system is restored.
- b) Strong vibration may cause distortion and interruptions in CD playback. This is not a malfunction.
- c) It is not recommended to leave discs in the open sun. Protect the disc surface from scratches.
Basic adjustments
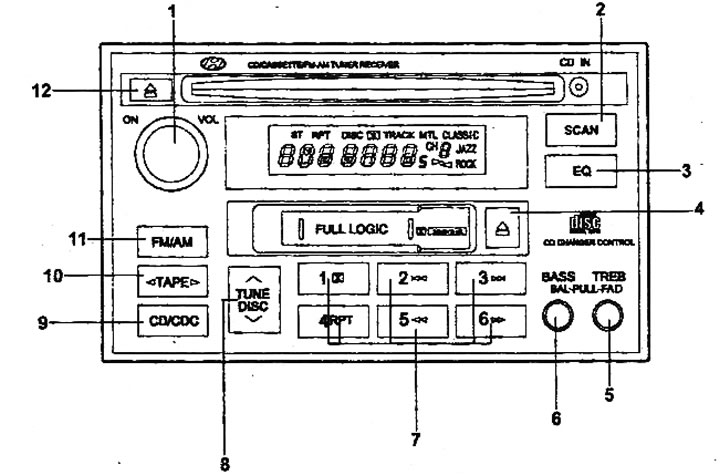
1. The audio system is switched on by pressing the control [1], the same control is used to adjust the sound volume. Also, the cassette player or CD player is automatically switched on when a cassette or CD is inserted. When the cassette or CD is ejected, the audio system will return to its original state - it will switch off or go into radio mode.
2. Adjusting the tone and balance.
The tone and balance are adjusted by turning the knobs [5] and [6]. Switching between adjustment parameters is done by pulling out the corresponding knob.
- BAS (low frequency tone).
- BAL (balance between right and left speakers).
- TREB (high frequency tone).
- FAD (balance between front and rear speakers).
Note: The parameter marked at the bottom of the handle is adjusted when it is extended.
Radio
Pressing the [11] button (AM-FM) turns on the radio, pressing it again switches the range (AM, FM1 or FM2).
Tuning radio stations
1. Press the [8] "TUNE" button until you hear a beep (automatic radio station search will be activated). The search will stop when a stable signal is found. If automatic search does not fix the tuning due to a weak signal from the radio station, press the tuning button again (automatic search will be deactivated) and perform manual tuning one step at a time. During stereo reception, the "ST" indicator will appear on the display.
Note: for the AM range the tuning step is 10 kHz, for the FM range the tuning step is 0.1 MHz.
2. You can also tune radio stations automatically using the [2] (SCAN) button, the receiver will tune in for 5 seconds to the received stations one after another in order of increasing radio reception frequency. To stop, press the button again.
Programming settings
1. The settings of the most frequently listened to radio stations can be entered into the memory of the radio. When programming manually, it is possible to memorize 6 stations in each range (AM, FM1, FM2), Note: If the battery is disconnected for a long time, all settings from the radio memory are erased and the factory settings are set instead.
2. To program settings manually:
- a) Select the range and tune to the desired radio station.
- b) Press and hold one of the [6] buttons (numbered 1 to 6) for more than two seconds. While the settings are being saved, the radio broadcast sound will be interrupted, then the display will show the station frequency and its memory number.
- c) Switching to the tuned radio station is done by briefly pressing the desired button.
Tape recorder
Immediately after inserting the cassette, the radio automatically switches to tape recorder mode and starts playing the cassette. To eject the cassette and switch to radio mode, press the (4) "EJECT" button.
Note: For the radio described in this manual, the audio cassette tape type is detected automatically.
Reverse
Changing the direction of playback of the cassette is done by pressing the button [10] "TAPE". The indicator on the display of the radio will show the direction of playback of the cassette.
Note: The playback direction of the tape will be changed automatically when the tape runs out during playback.
Fast forward
To rewind the tape, press one of the buttons [7] (rewind -
Automatic record search
This function is designed to jump to any of the records located before or after the current playback position. However, the total interval is 7 records. This means that you can only select 4 records before the current position (taking into account the current record) or 3 records after the current one. To do this, press the corresponding side of the [8] button (back -
Note: If the pause between recordings is less than 4 seconds or is filled with extraneous noise, a long fragment with weak sound or speech with long pauses is recorded, then the recording search function may not work correctly.
Noise reduction system
When listening to tapes recorded using the DOLBY noise reduction system (marked NR), press the [7] "1" (CP) button. Pressing it again turns the system off.
CD player
Switching to the CD player mode is done by pressing the [9] "CD" button. To switch off the CD player, press the [1] "PWR" button or switch the audio system to another mode by pressing the [11] "FM/AM" button.
Note: CD playback will stop when you press the EJECT button [12] on the CD player.
Selecting a Recording
To select a record (track), press the button [7] (the number is lower -
(The original can be read on the resource: www.HyundaiBook.ru)
Repeat recording
To play the current recording in a loop, press the [7] "RPT", "4" button. The display will show "RPT". To turn off this mode, press the button again.
Selecting a recording fragment
This function is designed to go to any fragment of the recording located before or after the current playback location. To do this, press the corresponding side of the button [7] (
Quick view of the disk
Pressing the (2) "SCAN" button plays 10 seconds of each recording on the current disc in order. The display will show "SCAN". Pressing this button again will play the selected (current) recording in full from the beginning.
Error codes
If the CD player does not work due to any malfunction, the following codes may appear on the display:
| Code | Malfunction |
| Eg2 | Defective CD playback mechanism |
| EgZ | Error reading data (CD defect) |
| Egb | CD defect (side) |
| Eg8 | Malfunction of the tape transport mechanism of the radio or malfunction of the cassette ejection mechanism |
| NNN | Playback stopped due to player overheating. |
| NO CD | No CD inserted |
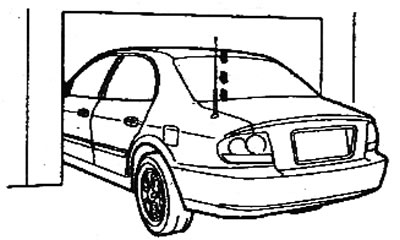
Antenna
Caution: Before washing your car or driving into a low-ceilinged area, make sure the antenna is removed, otherwise it may be damaged.
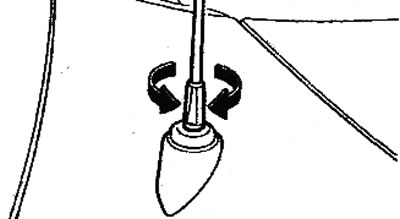
Whip antenna
This antenna is removable. To remove it, turn it counterclockwise. To install the antenna, turn it clockwise.
Retractable antenna
This antenna is brought into working condition manually. To do this, take hold of the upper end of the antenna and pull it upward until resistance appears.
Automatic retractable antenna
The antenna will automatically extend when the ignition key is turned to the "ON" or "ACC" position. When the ignition key is turned to the "LOCK" position, the antenna will automatically retract.