
Contents: Removal ⇓ Installation ⇓
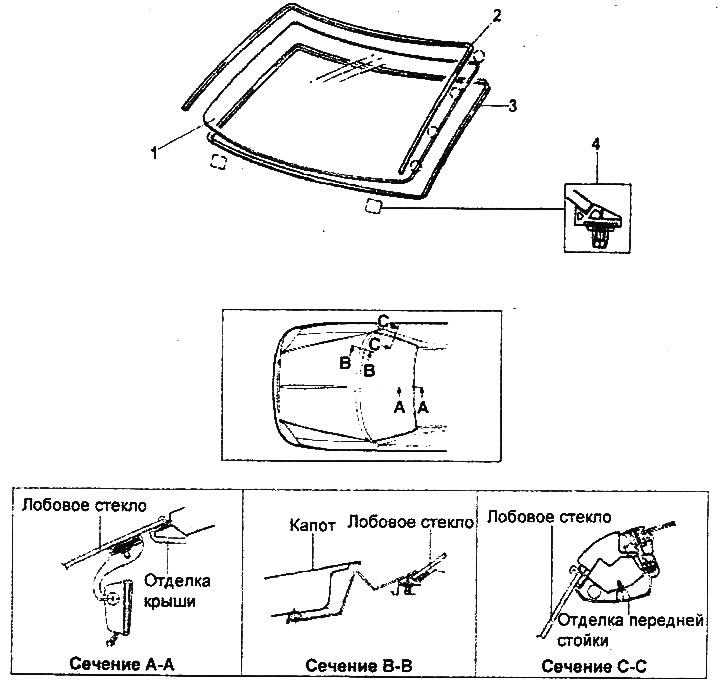
Windshield.
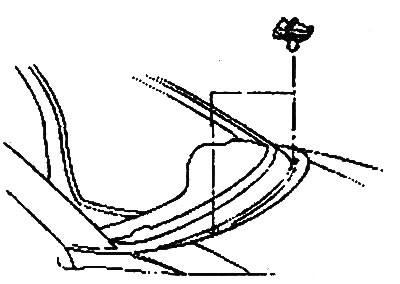
1 - windshield, 2 - upper outer glass molding, 3 - windshield seal, 4 - holder.
Removal
Note:
- To avoid hand injury, wear protective gloves.
- To avoid damage to vehicle surfaces, use protective covers.
1. Before you begin removing the windshield, you must first perform the following operations:
- Remove the front pillar trim.
- Remove the interior rearview mirror.
- Remove the windshield wiper arms.
- Remove the sun visor and roof assist handles.
- Remove the windshield wiper panel trim.
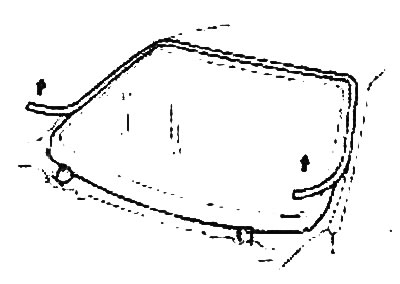
2. Remove the windshield molding and holders, using a special tool if necessary.
3. Lower the front portion of the roof trim.
Caution: Be careful not to damage the front of the roof trim.
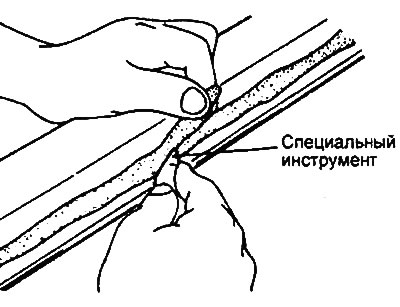
4. Using a special tool, saw through the layer of glue along the entire perimeter of the glass.
Attention: be careful not to damage the painted surfaces of the body with the knife; in case of damage, touch up with paint from the repair kit.

5. If you plan to reinstall the windshield, apply installation marks to the glass and body.
Note: Apply alignment marks to the glass and body using chalk or similar means.
6. Using a special tool, remove the windshield.

7. Check the body for damage.
Installation
1. Using a knife or a special tool, carefully cut off the remains of the old glue from the body sidewall along the entire perimeter of the body opening to a thickness of no more than 2 mm.
Caution: Be careful not to remove more old glue than necessary. Be careful not to damage the painted surfaces of the car body with the knife; in case of damage, touch up with paint from the repair kit.
2. Clean the surface of the body opening edging with a sponge soaked in alcohol or a compound for removing oil and wax (degreaser).
3. Install the windshield holders as shown in the figure.
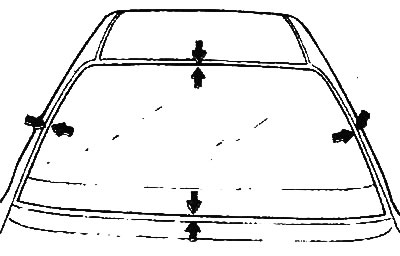
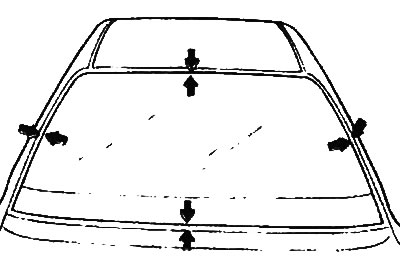
4. Center the new windshield in the body opening. Using a felt-tip pen, mark the relative position of the glass and the body with lines at four points, as shown in the figure.
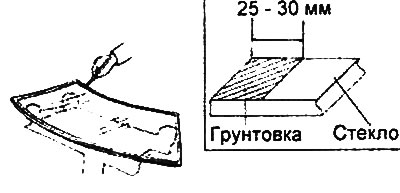
5. Apply a thin layer of primer to the surface around the periphery of the glass up to the rubber strip and then let it dry for 15 minutes.
Note:
- Do not apply body primer to glass.
- Do not touch primed surfaces with your hands. Otherwise, the adhesive bond will be unreliable, which will lead to water leaks into the interior after the windshield is installed.
- Prevent water, dirt and abrasive particles from coming into contact with the primed surface.
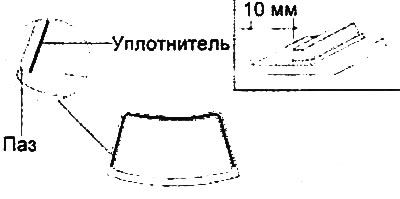
6. Glue the rubber strip to the inside surface of the glass along its entire perimeter, as shown in the figure. The strip is necessary to hold the glue during the installation of the glass.
7. Install the windshield molding. When installing, do not allow any gaps to form between the parts.
8. Apply a thin layer of body primer to the layer of glue remaining on the body sidewall around the entire perimeter of the body opening. The glass must be installed within 10 minutes after applying the primer.
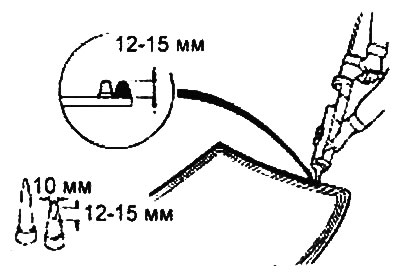
9. Fill a special container with glue, preventing the formation of air pockets between the layers to ensure continuous application of glue. Place the container in a pressure gun (syringe) or similar device and apply a layer of glue evenly around the entire perimeter of the glass.
Note: Apply adhesive within 5 minutes after applying primer.
10. Using vacuum suction cups or a special tool, place the glass on the body opening, aligning the installation marks previously made in point "4", and lightly press the glass evenly along the entire perimeter for complete adhesion.

11. Press the glass molding from the center of the car to the right and left pillars simultaneously.
- Glass thickness: 5 mm
12. One hour after applying the adhesive, perform a leak test on the windshield adhesive joint. When checking the leak test with cold water spray, be careful not to direct a strong stream of water at the new glass adhesive joint. The water should flow along the edges of the glass.
13. If water leaks are found in the interior, dry the defective area, then apply additional glue.
Note:
- After installing the windshield, leave the car stationary for at least 4 hours. If for any reason it is necessary to start using the car within the first 8 hours, then it is allowed to move only at low speed.
- Ensure the glass remains dry for 1 hour after installation.
14. After completing the installation of the parts, perform the following operations:
- Install the front pillar trim.
- Install the interior rearview mirror.
- Install the windshield wiper arms.
- Install sun visor and ceiling assist handles.
- Install the windshield wiper panel trim.
Note: Please follow the translated recommendations below for two to three days after glass installation:
- Do not slam doors when all windows are completely closed
- Avoid placing significant loads on the vehicle body, which occur when driving on rough terrain, roads with uneven surfaces, and driving onto curbs.