
Contents: Replacing lamps ⇓ Headlights ⇓ Headlight beam adjustment ⇓ Adjusting the light beam after…⇓ Designations ⇓
Replacing lamps
Before replacing the lamp, make sure the switch is in the "OFF" position. The following figures show how to replace the lighting lamps. When replacing, use only lamps that have the correct wattage.
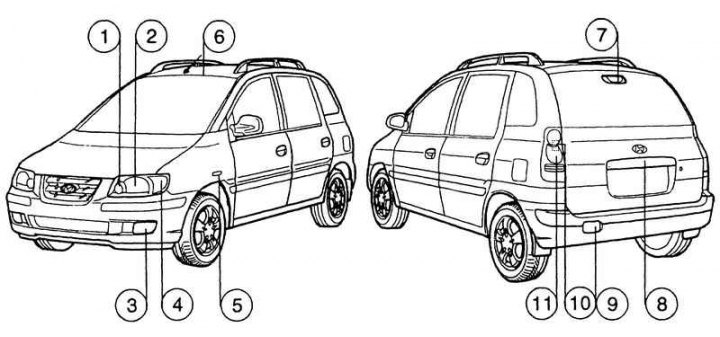
Fig. 1.184. Lighting system of the Hyundai Matrix
Headlights
1. Allow the lamp to cool.
2. Hold the lamp by the plastic base, do not touch the glass bulb with your hands.
3. Disconnect the power wire from the back of the plastic base on the rear of the headlight.
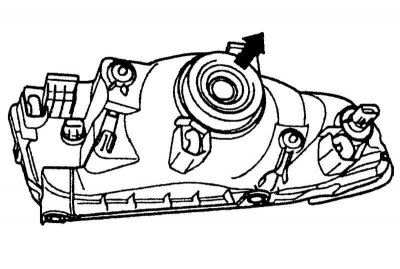
Fig. 1.185. Removing the protective cover
4. Remove the protective cover (Fig. 1.185).
5. Press the spring and remove the lamp.
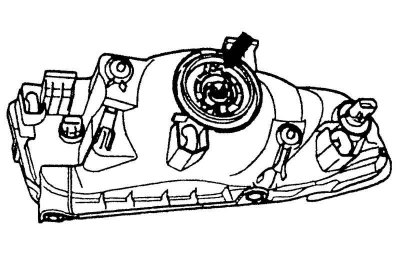
Fig. 1.186. Installing the protective cover
6. Remove the protective cap from the lamp being replaced and install the new lamp, aligning its plastic base with the hole in the headlight. Fasten the lamp spring, install the protective cover and connect the power cable (Fig. 1.186).
7. When disposing of the old lamp, use the protective cap and cardboard packaging.
8. Check that the headlight beam is adjusted correctly.
Warning! The halogen lamp is filled with gas under pressure, and if its bulb breaks, many fragments fly off, so always wear protective glasses when servicing the lamps. When the lamp is in operation, protect it from sand or scratches, as well as from various liquids getting on its surface. Turn on the lamp only when it is installed inside the headlight. If the headlight is damaged or cracked, replace the headlight. Keep the lamps out of the reach of children and handle the used lamp carefully.
Headlight beam adjustment
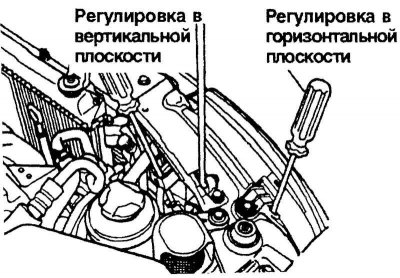
Fig. 1.187. Adjusting screws
Before adjusting the headlight beam, check the tire pressure. All tires must have the same nominal air pressure.
Place the car on a level surface and press the front and rear bumpers several times. Place the car at a distance of 3000 mm from the wall on which the adjustment screen is located.
Make sure the vehicle is unloaded (nothing but spare tire, jack, tools, full engine coolant, engine oil and fuel).
Wash the headlight lenses and turn on the low beam headlights.
Open the hood.
On the alignment screen, draw a horizontal line and vertical lines (passing through the center of each headlight).
Then draw a line parallel to and 30mm below the horizontal line.
Using a Phillips screwdriver, adjust the low beam illumination boundary line within the horizontal parallel lines.
Using a Phillips screwdriver, adjust the low beam illumination boundary line of the headlights within the vertical parallel lines.
Adjusting the light beam after replacing the headlight assembly
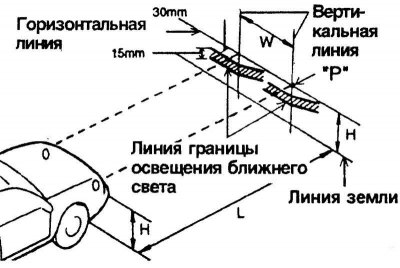
Fig. 1.188. Light beam adjustment diagram after replacing the headlights as a whole
If the headlight assemblies were replaced during body repair of the front part of the vehicle body, it is necessary to check the adjustment of the headlight beam using the screen, as shown in Figure 1.188. Set the headlight switch to the low beam position.
Adjust the headlight beam so that the beam's own axis is parallel to the center line of the vehicle body and coincides at point "P" shown in Figure 1.188.
The dotted lines in the figure indicate the centers of the headlights.
Designations
"W" – distance from the horizontal center line of the headlights to the ground: 656 mm.
"L" – distance between the centers of the headlights: 1164 mm.
Distance between headlights and the screen on which the test is performed: 3000 mm.