
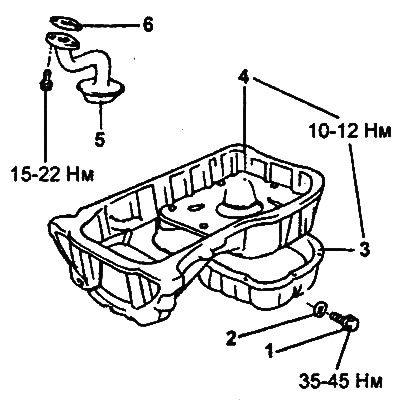
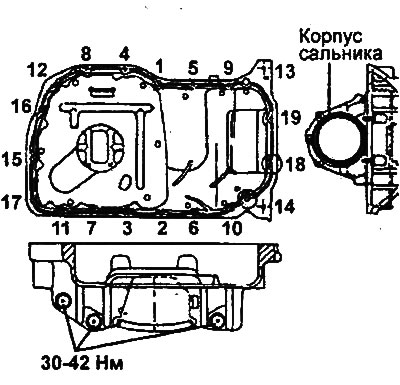
Oil pan (2.0L/2.4L engines). 1 - drain plug, 2 - gasket, 3 - lower part of the oil pan, 4 - upper part of the oil pan, 5 - oil intake, 6 - gasket. |
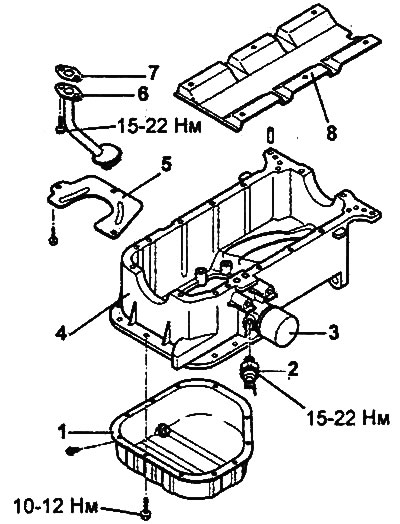
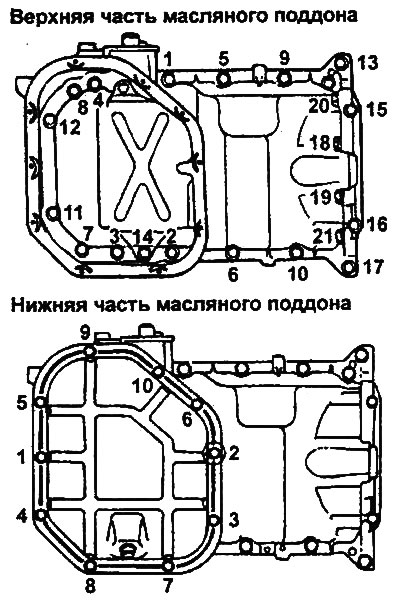
Oil pan (2.7L engine). 1 - lower part of the oil pan, 2 - oil pressure switch, 3 - oil filter, 4 - upper part of the oil pan, 5 - lower oil deflector plate, 6 - oil intake, 7 - oil intake gasket, 8 - upper oil deflector plate. |
Removal
1. Drain the engine oil.
2. Using a 24 mm socket, unscrew the oil pressure switch.
Note: Be careful not to damage the oil pressure switch sensor as the sensor threads are coated with sealant.
3. (2.0L / 2.4L engines) If necessary, remove the timing belt.
4. Remove all oil pan mounting bolts.
5. Using a rubber-faced hammer, tap the oil pan, then remove the pan (upper and lower parts).
Examination
Checking the oil filter seat
1. Check that there is no damage to the contact surface of the oil filter.
2. Check for cracks or oil leaks.
Oil pan and oil pickup
1. Check the oil pan for deformation, damage or cracks. Replace if defective.
2. Check the oil intake for deformation, damage or cracks. Replace if defective.
Installation
1. Installing the oil pan.
- a) Remove the remains of the old gasket from the oil pan flange and the cylinder block mating surface. After cleaning, degrease the surfaces to apply the sealant.
Note: Before applying sealant, make sure the oil pan flange and the mating surface of the cylinder block are dry and clean.
- b) Apply a continuous bead of sealant approximately 4 mm in diameter around the entire flange of the upper and lower parts of the oil pan as shown in the figure.
Sealant:
- 2.0L/2.4L Engines: Three Bond 1104 or equivalent
- 2.7L Engine: Three Bond 1141E, ЗМ ATD #8660 or equivalent
Attention:
- To prevent oil leaks, apply sealant to the bolt holes on the cylinder block.
- Install and secure the oil pan within 15 minutes after applying the sealant.
- Apply the specified amount of sealant so that when tightening the pan, the sealant is not squeezed out beyond the flange.
- After assembly, wait at least 30 minutes before adding engine oil to the engine.
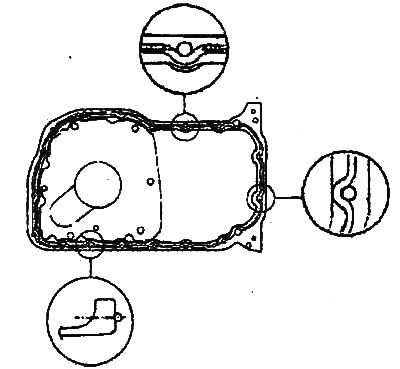
Engines 2.0 l / 2.4 l. |
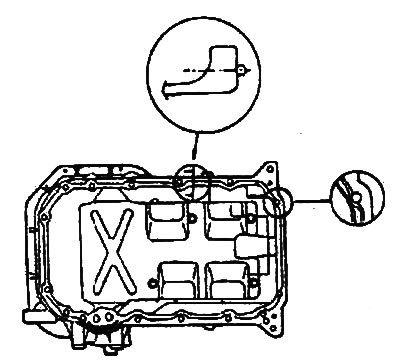
Engines 2.7 l. |
- c) Install the oil pan (upper and lower parts) and tighten its mounting bolts to the specified torque.
Please note: The oil pan mounting bolts installed in the indicated locations are of different lengths.
Tightening torques:
- Engines 2.0L/2.4L:
- Oil pan bolts: 10-12 Nm
- 2.7L Engine:
Table: Upper Oil Pan Bolts
| Bolt numbers (No.) | Size, mm | Tightening torques, Nm |
| 1,5,6,9,10,13,17 | 8x22 | 19-28 |
| 15,16 | 171,5 | 5-7 |
| 18,19,20,21 | 10x38 | 30-42 |
| 2,3,4,7,8,11,12,14 | 152,5 | 5-7 |
- Lower oil pan bolts: 10-12 Nm
(The original can be found on the resource: HyundaiBook)
2. (2.0L / 2.4L engines) Install the timing belt (if removed).
3. Install the engine oil pressure switch.
Note: Installation of the engine oil pressure switch is shown in the "Sensors and valves" section.
4. Fill with engine oil and check for leaks.
Engines 2.0 l / 2.4 l. |
Engines 2.7 l. |