
Contents: Adjusting the longitudinal position…⇓ Adjusting the seat backrest tilt ⇓ Adjustable headrests ⇓ Lumbar support adjustment (driver's…⇓ Seat cushion height adjustment…⇓ Tray under the front passenger seat ⇓ Adjusting the longitudinal position…⇓ Adjusting the angle of the rear seat…⇓ Adjustable rear head restraints…⇓ Folding the rear seat cushion and…⇓ Heated front seats (optional) ⇓ Ashtrays ⇓ Front cup holders (optional) ⇓ Rear cup holder (optional) ⇓ Rear seat centre armrest (optional) ⇓
Warning! Adjust the seat only when the vehicle is stationary. Failure to do so may result in loss of control over the vehicle and a traffic accident.
Adjusting the longitudinal position of the front seat
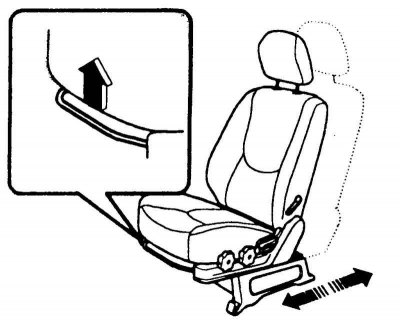
Fig. 1.88. Adjusting the longitudinal position of the front seat
To move the seat in the longitudinal position, lift the adjustment lever up. This will release the seat and allow it to be moved forward and backward to a comfortable position. Once installed, release the adjustment lever and move the seat forward or backward slightly to lock it in the new position.
Adjusting the seat backrest tilt
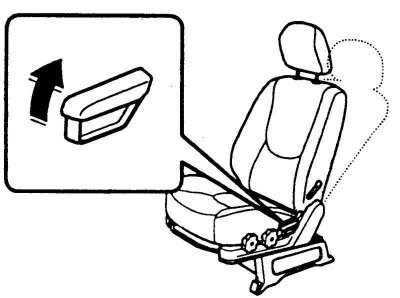
Fig. 1.89. Adjusting the seat backrest tilt
To recline the seatback, lean forward to remove your weight from the seatback and pull the seatback recline lever, located on the outside of the seat, up. Press the seatback down to the desired position. To lock the seatback in the new position, release the seatback recline lever.
Warning! To reduce the risk of injury in the event of a traffic accident or sudden braking while the vehicle is moving, the driver's and front passenger's seat backs should be kept as close to an upright position as possible. The effectiveness of seat belts and air bags may be significantly reduced when the seat back is reclined.
Warning: There is a high probability that when the seatback is reclined, the driver and front passenger may slip out from under the seat belt, resulting in serious injury in the event of a vehicle collision in a traffic accident.
Warning: The seat belt may not provide full protection to the passenger when the seat back is reclined.
Adjustable headrests
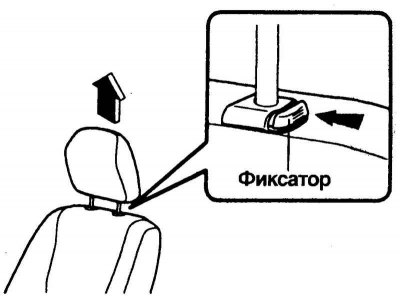
Fig. 1.90. Headrest adjustment
Headrests provide protection for the neck area.
To raise the head restraint, pull it up. To lower the head restraint, press it down while pressing the lock.
Lumbar support adjustment (driver's seat only) (optional)
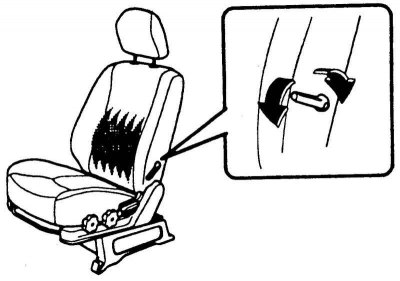
Fig. 1.91. Adjusting the lumbar support
To adjust the lumbar support, turn the special lever located on the outer or left side of the driver's seat back. To increase the support force, move the lumbar support adjustment lever toward the front of the car. To decrease the support force, move the lever toward the rear of the car.
Seat cushion height adjustment (driver seat only) (optional)
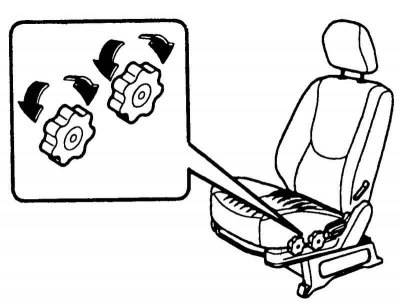
Fig. 1.92. Adjusting the height of the seat cushion
To raise or lower the front of the seat cushion, turn the front handle forward or backward. To raise or lower the rear of the seat cushion, turn the rear handle forward or backward.
Tray under the front passenger seat
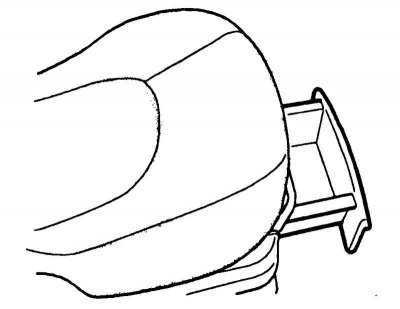
Fig. 1.93. Tray under the front passenger seat
There is a tray under the front passenger seat (Fig. 1.93).
To open it, pull it forward.
Adjusting the longitudinal position of the rear seat
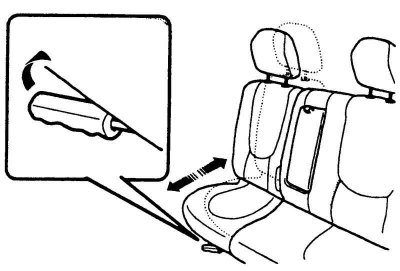
Fig. 1.94. Adjusting the longitudinal position of the rear seat
To move the seat in the longitudinal position, lift the adjustment lever up. This will release the seat and allow it to be moved forward and backward to the desired position. Once in a comfortable position, release the adjustment lever and move the seat slightly forward or backward to lock it in the new position.
Adjusting the angle of the rear seat backrest
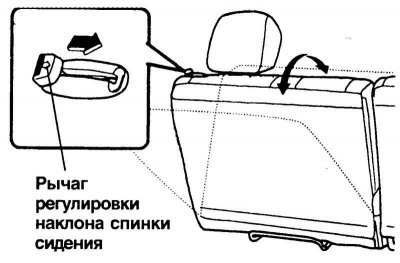
Fig. 1.95. Adjusting the longitudinal position of the rear seat
To tilt the seat back, pull the seat back tilt adjustment lever towards the headrest and release the lever after the seat back is in the desired position. After the seat back is in the desired position, always check that it is securely locked.
Adjustable rear head restraints (optional)
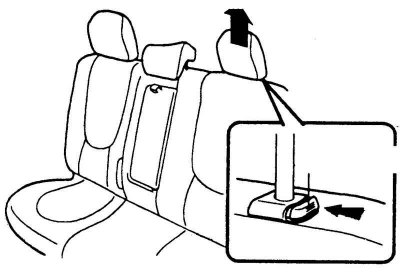
Fig. 1.96. Adjusting the rear seat headrests
To raise the head restraint, pull it up. To lower the head restraint, press it down while pressing the lock.
Folding the rear seat cushion and backrest
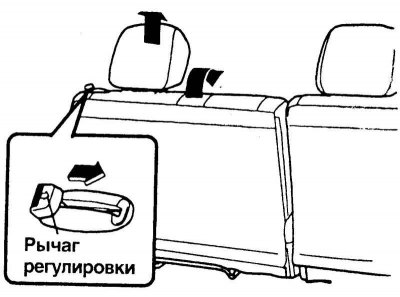
Fig. 1.97. Folding the rear seat cushion and backrest
For convenience, the backrest and cushion of the rear seat can be folded and unfolded.
To fold the seatback, move it to the rearmost position.
Remove the headrests.
To fold the seatback, pull and hold the seatback recline lever toward the head restraint, then lower the seatback down.
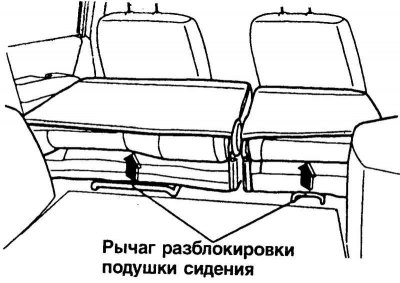
Fig. 1.98. Raising the rear seat cushion and backrest
Pull the seat cushion release lever up and then lift the rear seat cushion up (Fig. 1.98).
Caution: To prevent damage to the rear seat cup holder located in the rear console, remove it first and then fold down the rear seatback and cushion.
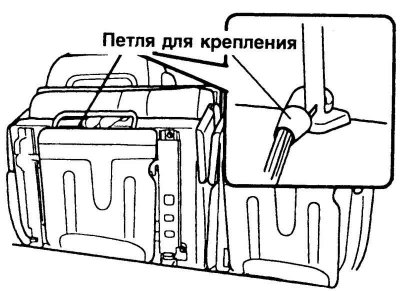
Fig. 1.99. Fixing the seat
To secure the seat, fasten the fastening loop located under the seat cushion to the headrest holder of the driver and front passenger seats (Fig. 1.99).
Insert the removed head restraints between the backrest and the rear seat cushion so that they are not thrown into the vehicle interior in the event of sudden braking or an accident.
To return the rear seat back and cushion to their normal position, repeat the above operations in reverse order.
After returning the seatback to the upright position, make sure it is securely locked by rocking the seatback forward and backward by its top.
Caution: When returning the rear seatback to the upright position after the seat has been folded, be careful not to damage the seat belt webbing or buckle. Also, do not allow the seat belt webbing or tongue to become caught in the rear seat.
Warning! The forward-folding rear seat cushion and forward-tilting rear seatback are designed to carry more luggage in the vehicle. Do not allow anyone to sit on the luggage while the vehicle is moving. When the rear seatback is folded down, the seat belts cannot be used. Incorrectly seated and unbuckled passengers can be seriously or fatally injured in the event of sudden braking or an accident. Luggage must not be placed higher than the front seatbacks. This may cause the luggage to shift forward and cause serious injury in the event of sudden braking or an accident.
Warning! When returning the rear seat back to the upright position after the seat has been folded, make sure that the head restraints are properly secured. Head restraints are essential for the safety of vehicle occupants in the event of a traffic accident. If the head restraints are not properly positioned, serious or even fatal injuries may occur in a rear-end collision.
Heated front seats (optional)

Fig. 1.100. Front seat heating switches
For cold weather driving, the vehicle has heated front seats. With the engine running, press either the driver's or passenger's seat heater switches. In moderate weather or when heated seats are not needed, the seat heater switches should be in the "OFF" position.
Do not hold the cigarette lighter in the fully recessed position. This may damage the heating element and cause a fire. If it is necessary to replace the cigarette lighter, use only the original cigarette lighter or an equivalent one.
Ashtrays

Fig. 1.101. Front and rear ashtrays
To open the front ashtray, press and release its top edge.
To remove the ashtray from its cleaning slot, remove the metal ash container. Press the ash container down and forward inside the ashtray and then pull it out. To replace it, position the ash container in the correct position and press it down and forward to lock the lower edge of the ash container inside the ashtray. The ashtray light only lights up when the vehicle's exterior lights are on.
Front cup holders (optional)
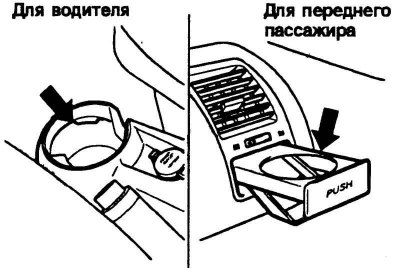
Fig. 1.102. Front cup holders
The cup holder is used to hold glasses and bottles in the existing holes.
To use the front passenger cup holder, press the cup holder and pull it out.
Warning! Do not place foreign objects on the cup holder. They may be thrown into the car and injure passengers in the event of sudden braking or a traffic accident.
Rear cup holder (optional)

Fig. 1.103. Rear cup holders
The rear cup holder is located on the rear main console and serves to hold cups and bottles in the provided slots. To use it, press the handle on the rear main console down and pull it out by the top edge.
Caution: To prevent damage to the rear seat cup holder located in the rear console, remove it first and then fold down the rear seatback and cushion. Return the cup holder to its original position when not in use.
Rear seat centre armrest (optional)
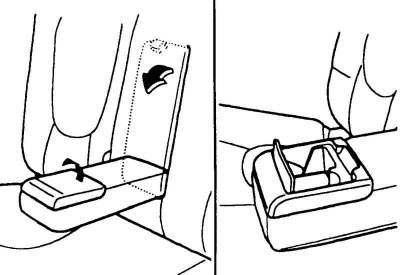
Fig. 1.104. Rear seat center armrest
This armrest is located in the center of the rear seat back and has a storage compartment. By opening the lid of the storage compartment, you can use the cup holder inside.