
HyundaiBook.ru
Repair Chevrolet Repair Honda Repair Toyota Repair Land Rover Repair VAZ Repair Renault Repair Nissan
English Русский
Български
Беларускі
Український
Српски
Hrvatski
Română
Polski
Slovenský
Magyar
ArticlesSitemapContacts  


  Accent   Elantra   Getz   Grandeur   Sonata   Santa Fe   Tucson   Others
Matrix (2001-2010, petrol)
  • Main
  • Hyundai
  • Matrix (2001-2010)
  • Transmission
  • Drive shafts
  • Removal, checking and installation the front wheel drive shaft

Removal, checking and installation the front wheel drive shaft (Mitsubishi Matrix)

0
Contents: Removal ⇓ Examination ⇓ Installation ⇓
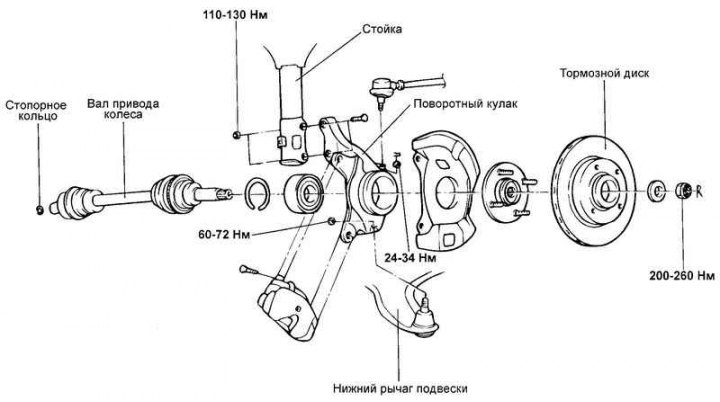
Fig. 3.115. Front wheel drive shaft

Fig. 3.115. Front wheel drive shaft


Removal


Raise the vehicle and remove the front wheel.

Remove the cotter pin and unscrew the nut securing the wheel drive shaft to the wheel hub.

Drain the oil from the gearbox.
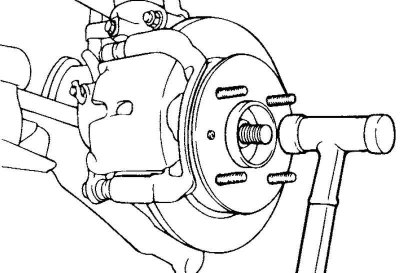
Fig. 3.116. Disconnecting the wheel drive shaft

Fig. 3.116. Disconnecting the wheel drive shaft


Using a plastic hammer, disconnect the wheel drive shaft from the wheel hub (Fig. 3.116).

Pull the wheel hub outward from the vehicle and separate the wheel drive shaft from it.
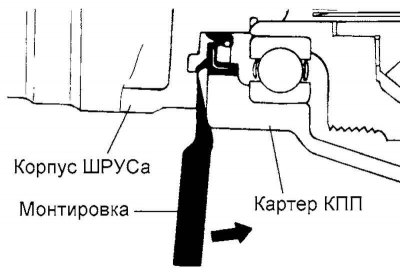
Fig. 3.117. Disconnecting the wheel drive shaft from the gearbox

Fig. 3.117. Disconnecting the wheel drive shaft from the gearbox


Insert a pry bar between the gearbox housing and the CV joint housing of the wheel drive shaft, and then disconnect the wheel drive shaft from the gearbox (Fig. 3.117).

Caution! Be careful when disconnecting the wheel drive shaft with a pry bar, do not damage the gearbox housing and the CV joint of the shaft.


Caution! To avoid damaging the seal, do not insert the pry bar too deeply (maximum 7 mm).


Caution! Do not pull out the wheel drive shaft with significant force, as such an operation will damage the internal parts of the Birfield BJ or Tripod TJ CV joint of the wheel drive shaft (rupture of the boot or damage to the bearing).


Caution: Use a special plug to close the hole in the gearbox to prevent dirt and foreign particles from getting inside.


Caution: Hold the wheel drive shaft securely.


Caution: Always replace the retaining ring (retainer ring) after disconnecting the wheel drive shaft from the gearbox.


Examination
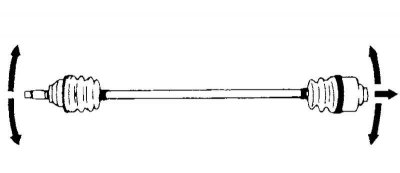


Fig. 3.118. Checking the drive shaft

Fig. 3.118. Checking the drive shaft


Check the protective cover of the CV joint of the wheel drive shaft for damage and deterioration of its technical condition.

Check the ball joints for excessive wear and tear and for mobility.


Check the splined portion of the wheel drive shaft (and hub) for excessive wear or damage.

Check the dynamic damper for damage or cracks.

Installation


Lubricate the drive shaft splines and the contact surfaces of the differential housing (in the gearbox) with transmission oil.

Before installing the wheel drive shaft, position the retaining ring so that its lock faces downward.

After installing the wheel drive shaft, check that the shaft is securely fixed and cannot be removed by hand.
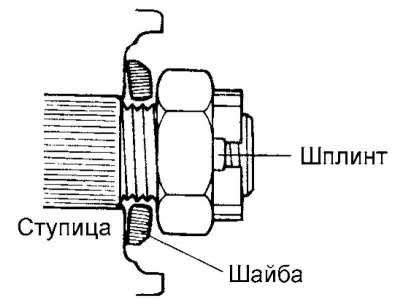
Fig. 3.119. Installing the washer and nut for fastening the drive shaft

Fig. 3.119. Installing the washer and nut for fastening the drive shaft


Install the washer with the convex side facing outward, then install the wheel drive shaft mounting nut and cotter pin (Fig. 3.119).

Always replace the drive shaft locking nut and cotter pin with new ones each time the shaft is disconnected from the hub.
This article is available at russian, bulgarian, belarusian, ukrainian, serbian, croatian, romanian, polish, slovak, hungarian
This article has been reviewed by: Konstantin Smirnov
Add to social network:

Previous
Matrix: Drive shafts
Next

Front wheel drive shaft (CV joint with length compensator (DOJ) and CV joint «Birfield BJ»)
Front wheel drive shaft (CV joint «Tripod TJ»)
Front wheel hub and steering knuckle parts
Rear wheel hub
We recommend other articles on the topic of Hyundai manuals:

Checking the condition of the drive shaft boots Hyundai Accent 3 (2005-2010)
Steering, front wheel drive — checking the dust boots of the… Hyundai Elantra 1 (1990-1995, petrol)
Checking the front wheel steering angle Hyundai Getz (2002-2011)
Disassembling the front drive shaft (models with automatic… Hyundai Sonata 4 (2001-2012, petrol)
Removal, checking and installation the front wheel drive shaft Hyundai Santa Fe 2 (2007-2012, petrol)
Front Drive Shafts — Checking Technical Condition Hyundai Tucson 2 (2009-2015)

Link in different formats to this article

Visitor comments
No comments yet


How much will 39 + 18 ?


Matrix (2001-2010, petrol) 
  • User manual
  • Control devices
  • Salon equipment
  • Car driving
  • Current service
  • Vehicle specifications
  • Power unit
  • Engine specifications
  • Engine maintenance
  • Engine repair 1.6 l
  • Engine repair 1.8 l
  • Cooling and lubrication system
  • Power and exhaust system
  • Control system
  • Transmission
  • Transmission specifications
  • Clutch
  • Mechanical gearbox
  • Automatic gearbox
  • Drive shafts
  • Chassis
  • Suspension and wheels
  • Steering
  • Brake system
  • Body
  • Exterior (external elements)
  • Passive safety system
  • Heater and air conditioner
  • Electrical equipment
  • Specifications
  • Equipment and devices
  • Power devices
  • Electrical circuits
HyundaiBook.ru © 2018-2026 · Mobile version · Sitemap: EN BG BY UA RS HR RO PL SK HU · Administration · Site search · Hyundai owners Accent 1 · Accent 2 · Accent 3 · Elantra 1 · Elantra 2 · Elantra 3 · Getz · Sonata 3 · Sonata 4 · Santa Fe 2 · Tucson 1 · Tucson 2 · Matrix ·
This site uses cookies to optimize its functionality. By continuing, you agree to our terms.