HyundaiBook.ru
Repair Chevrolet Repair Honda Repair Toyota Repair Land Rover Repair VAZ Repair Renault Repair Nissan
English Русский
Български
Беларускі
Український
Српски
Hrvatski
Română
Polski
Slovenský
Magyar
ArticlesSitemapContacts  


  Accent   Elantra   Getz   Grandeur   Sonata   Santa Fe   Tucson   Others
Santa Fe 2 (2007-2012, petrol)
  • Main
  • Santa Fe
  • CM (2007-2012)
  • Engine 2.0 and 2.4 liters
  • Engine maintenance
  • Checking the tightness of the cooling system

Checking the tightness of the cooling system (Hyundai Santa Fe CM)

0
Remove the radiator cap.

Make sure the coolant level reaches the radiator filler neck.

Fig. 2.4. Connecting the tester to…

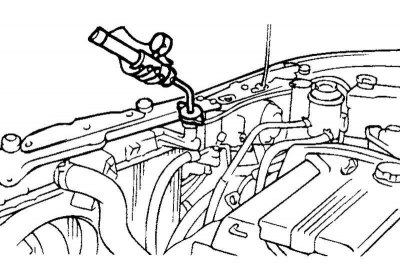
Fig. 2.4. Connecting the tester to check the radiator cap valve


Connect the radiator cap valve tester to the radiator filler neck and apply a pressure of 150 kPa. Maintaining this pressure for 2 minutes, check for coolant leaks from the radiator, hose connections or the cooling system hoses themselves (Fig. 2.4).

Note: Coolant may be extremely hot. Do not remove the radiator cap as this will cause steam to escape and hot or boiling fluid to splash out, possibly causing injury to service personnel. Allow the engine to cool before working on the cooling system.


Thoroughly remove moisture from the surface of all parts being checked for leaks.

(The original article is posted on the portal www.hyundaibook.ru)

When removing the radiator cap valve tester from the radiator neck, be careful not to splash any coolant.

When connecting and disconnecting the tester, as well as during testing, be careful not to deform the radiator filler neck.

If leaks are present, repair or replace the appropriate part.
This article is available at russian, bulgarian, belarusian, ukrainian, serbian, croatian, romanian, polish, slovak, hungarian
This article has been reviewed by: Konstantin Smirnov
Add to social network:

Previous
Santa Fe 2: Engine maintenance
Next

Replacing the oil filter
Selecting an oil filter
Engine oil change
Checking the engine oil level
Checking the radiator cap valves
Checking the concentration of antifreeze
Compression check
Adjusting the tension of the drive belts of mounted units
Attachment drive belt tensioner
We recommend other articles on the topic of Hyundai manuals:

Checking the tightness of the cooling system Hyundai Accent 2 (1999-2005)
Checking the tightness of the cooling system Hyundai Elantra 1 (1990-1995, petrol)
Checking the electric fans of the cooling system Hyundai Getz (2002-2011)
Checking the cooling system for leaks, composition of the coolant Hyundai Sonata 3 (1993-1998)
Checking the tightness of the cooling system Hyundai Tucson 1 (2005-2010)
Checking the tightness of the cooling system Hyundai Matrix (2001-2010, petrol)

Link in different formats to this article

Visitor comments
No comments yet


How much will 25 + 28 ?


Santa Fe 2 (2007-2012, petrol) 
  • User manual
  • Control devices
  • Heating and ventilation
  • Seat control
  • Car driving
  • Maintenance and care
  • Vehicle Specifications
  • Engine 2.0 and 2.4 liters
  • Engine specifications
  • Engine maintenance
  • Engine repair
  • Cooling system
  • Intake and exhaust system
  • Fuel system
  • Engine 2.7 liter
  • Engine maintenance
  • Engine repair
  • Cooling system
  • Intake and exhaust system
  • Transmission
  • Transmission specifications
  • Mechanical gearbox
  • Automatic gearbox
  • Drive shafts
  • Chassis
  • Suspension and wheels
  • Steering
  • Brake system
  • Body
  • Exterior (external elements)
  • Electrical equipment
  • Equipment and devices
  • Power devices
  • Specifications
HyundaiBook.ru © 2018-2026 · Mobile version · Sitemap: EN BG BY UA RS HR RO PL SK HU · Administration · Site search · Hyundai owners Accent 1 · Accent 2 · Accent 3 · Elantra 1 · Elantra 2 · Elantra 3 · Getz · Sonata 3 · Sonata 4 · Santa Fe 2 · Tucson 1 · Tucson 2 · Matrix ·
This site uses cookies to optimize its functionality. By continuing, you agree to our terms.